Pulling together a couple of helpful posts into one place so that I can find it later...
I wanted to deploy an assembly to the Global Assembly Cache (GAC) on a Windows 2008 server - GacUtil isn't neccessary installed, and I don't really want to install the entire SDK on to the server just to get it.
PowerShell to the rescue!
The first thing I needed to do was enable PowerShell to load .Net 4 assemblies, this was done by adding a config file into the PowerShell home directory (run $pshome from a PowerShell console), with the following contents:
<configuration>

  <startup uselegacyv2runtimeactivationpolicy="true">

    <supportedruntime version="v4.0.30319" />

    <supportedruntime version="v2.0.50727" />

  </startup>

</configuration>
You can then run the following commands to load the 4.0 instance of EnterpriseServices, which will install your libraries into the correct GAC depending on it's target runtime:
[System.Reflection.Assembly]::LoadWithPartialName("System.EnterpriseServices")

$publish = New-Object System.EnterpriseServices.Internal.Publish

$publish.GacInstall("C:\PathTo\Your.Assembly.dll")
Filed under: .Net, Fixes
I pre-ordered the Windows Surface back in October and have been running it fairly happily ever since, but thought I ought to write up what I've found to be good and bad with it, especially in comparison to other tablets, notably the Nexus 7.
Accounts
This is the key win for me, Windows 8 comes with Family Safety built in, which means I can set up separate accounts for each of my kids, enable curfews and time limits that just work. On top of that, I can restrict their web access appropriately along with the game ratings from the store. They then get prompted that something's been blocked and can request permission. This is something that I've not seen on the Apple devices at all, and while the Nexus supports multiple accounts there's no restrictions or sharing. Which leads me to:
App Sharing
Once you have account, the issue of purchasing apps comes up, and Microsoft's answer is that apps you've purchased can be downloaded onto up to 5 machines and downloaded to other's accounts. So I purchase the app on my account, my son logs in, I go to his Store app, go into the settings and switch to my account. I can then see all the apps I've purchased but not installed on here and install it for him, after re-entering my password (I'm not that foolish). In general this works fairly well, and a lot better than it does on Android, where I have to link my account completely with his, including mail, etc.
Content Consumption
There's good and bad elements to the Surface form factor - clearly being a 10" widescreen device, watching HD content on the iPlayer or similar works really well - especially with the HDMI output. Couple that with a USB input and we can easily pull the latest round of pictures off the camera, sort through them and share a few out there (just about - see App ecosystem below). For reading it can depend on the app: in portrait mode pages in Kindle Reader are a little too long, and it's a little top heavy that way, but I've got a nice RSS reader that has a great three column layout with feed categories, feeds and then the actual posts spreading across the landscape device.
Content Creation
Well, words at any rate - the touch screen finger painting style creation works well across all platforms - for long form note taking, the Type cover owns this space, there is no competition from on screen options here. The Touch cover is good for incidental notes, but as others have noticed, it is a bit picky about the angle it works at, which is a shame. The on screen keyboard is however very adaptive, allowing you to choose between a full keyboard for when the Surface is flat on a table or lap, and the split thumb keyboard, which is good for when you're carrying it - the keyboard is split in two allowing your thumbs to reach all the keys even with the 10" screen. On top of that, the on screen keyboard also has the left and right arrows for easy navigation and corrections.
App ecosystem
This is the biggest issue really: My wife was hoping to use the tablet occasionally for her work in Speech and Language Therapy, however all the apps out there are obviously for the iPad (even the Play Store seems a bit light in that respect, although there are some).
Filed under: Tablets, Windows 8
I've been working on a couple of Proof of Concept demos for a client that's looking to implement a Single Sign On solution on their new site, and one of the offerings was from Symplified. Seeing as there doesn't appear to be much out there on this, especially within an ASP.Net context I thought I'd write up my experience.
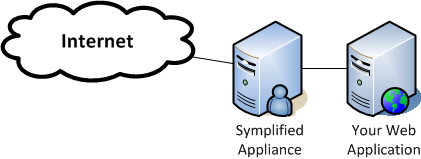
The first thing to realise is that Symplified works as a reverse proxy, sitting between your server and your users (reverse in that it's a proxy you put in place rather than your user's ISP). So all requests hit the Symplified app server first before they are forwarded on to your servers. All authorisation is handled by the Symplified app, so you shouldn't be locking things down with the authorization elements in web.config files.
However, you can still use some of the features that the framework provides you with a bit of care.
Membership Provder
I started off with the idea of implementing a custom Membership Provider to handle the authentication/authorisation aspects (as this had worked well in the previous PoC based on PingFederate).
CreateUser
You can still implement the CreateUser method in a custom membership provider, as you will need to provision users within Symplified, especially if you want to allow direct registration.
In Symplified's world, you will need to make three calls to a rest service:
-
Create a session token
-
Create a user
-
Reset the user's password
You need to reset the password as by default the users appear to be created with an expired password, and resetting it to the same value fixes this - note that Symplified will also send an email to the user informing them that they've reset the password - you may want to suppress this.
Not too bad, however handling errors from the create user service is a little tedious:
-
If any of the parameters don't match the patterns expected you'll get a 500 lnternal Server error returned with plain text error messages in the XML response.
-
If the user already exists you'll get a 400 Bad Request, again with the error description in the XML.
These plain text error messages will need to be parsed and mapped to MembershipCreateStatus values to get sensible errors back to your controls.
ValidateUser
You can't really implement the ValidateUser method however, as there's nothing in the API you can call to do this, the user's login credentials need to be sent directly to Symplified's SSO application so it can set it's cookies appropriately, and then pass some headers through to your "secure" areas.
So, how do you handle an authenticated user?
When the user is viewing a "secure" area of your site, Symplified will send a number of additional headers along with the request, which will include things like the Username, which can then be used to generate a Forms Authentication ticket and a Membership Priniple that you can fill for the app to use later.
For the PoC I implemented that logic in a custom Module that hooks into the application's AuthenticateRequest event.
OpenId Users
The one big issue so far has been around users authenticating via OpenId providers. These users are authenticated without a user being be provisioned in Symplified, which could well be an issue for you. The solution we put in place within the PoC was to check for the headers stating this was a login from the OpenId provider, and then attempt to create a user within Symplified, and ignoring the duplicate username error message - the Symplified engineers were looking at adapting the solution so that if the OpenId user matched known user it would send additional headers which would allow me to skip the creation step.
Next Steps
If we decide to go forward with Symplified there are a number of changes I'd like to make:
-
Only create the user context if the request comes from the Symplified app.
-
Implement the GetUser methods using the Symplified API.
-
Redirect requests to the Symplified applicance if they don't come from there.
-
Don't try and create the user on every single request!
Filed under: ASP.NET, SSO
Just to keep things ticking over while job hunting, I'm working on a site for a friend of a friend:
Crispin Marine London
Pete Crispin's a London based Marine Surveyor, who consults on both commercial and private vessels, and operates worldwide.
We're working on the Information Architecture at the moment, and will be putting together a small CMS for him in the coming weeks.
Filed under: Websites
If you're considering moving to Office 365, you've probably been looking into the options for Directory Synchronisation. If your AD is anything like ours, you'll have a number of accounts for services, ex-staff, contractors, etc. that you don't really want synchronised up to Office 365.
By default there's no control over the filtering of accounts within the Directory Sync Configuration tool, and the content on setting this up has been "coming soon" for over 6 months, which is a shame, however, when you run the Office 365 Deployment Readiness Tool you'll see the following line in the reports:
Filters were applied to obtain the above object counts for an Office 365 deployment.
So clearly these filters are configured somewhere - but where?
Hunting around on the web, I've found a very useful post for the initial setup scenario from credera: Filtering Users in the Office 365 Directory Synchronization Tool where they talk about using the UI based on Forefront Identity Manager (FIM 2010) - and suggest you run this before DirSync runs. I failed to realise the implication of one aspect of this: Even if you clear the "Synchroize directories now" so DirSync doesn't force the update, you've started the service and the 3 hour timer - so don't start this just before you go home for the weekend, otherwise you'll end up with all your accounts online like I did.
So how do you implement filtering after you've done initial import? Well, it's not too painful once you've looked around at the systems.
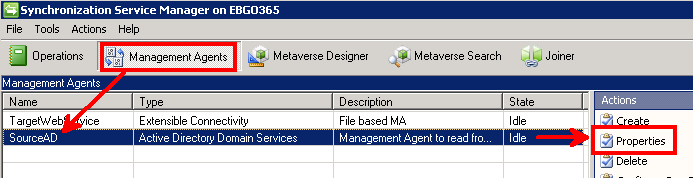
Start by firing up the Synchronization Service Manager through using the miisclient.exe executable found deep in the Sync Service's UIShell folder, and switch to the "Management Agents" pane. Click on the "SourceAD" Management Agent line, and select Properties.
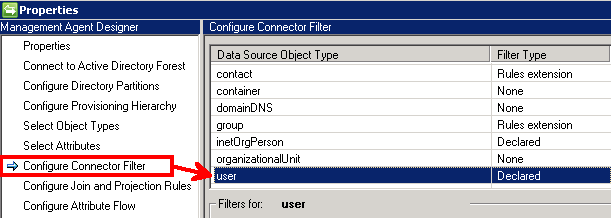
Then select the "Configure Connector Filter" (apparently you can also do things with the Directory Partitions - your milage may vary), select "user", and create a "New..." rule:
As I'm only interested in importing users from our "Staff" organizational unit, and groups from our "Company_UserGroups" OU, I set up one filter with the following rules:
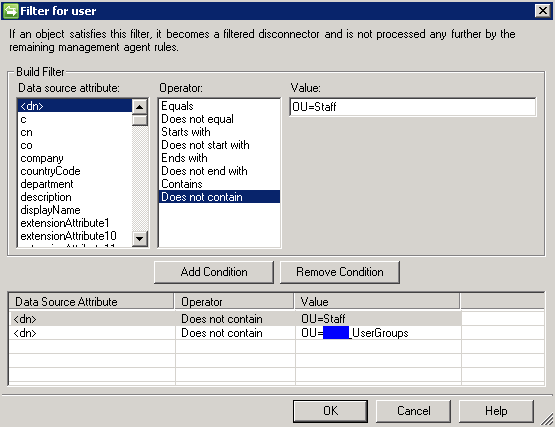
"<dn>" "Does not contain" "OU=Staff"

"<dn>" "Does not contain" "OU=Company_UserGroups"
Ok out of the dialogs and return to the "Operations" page. You now need to perform a Full synchronisation to remove the filtered out users:
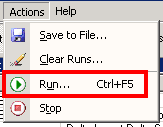
From the Actions menu, select "Run..."
Ensure that "SourceAD" Management Agent is selected in the top dropdown, then select "Full Import Full Sync" from the list of Run profiles, and press "OK".
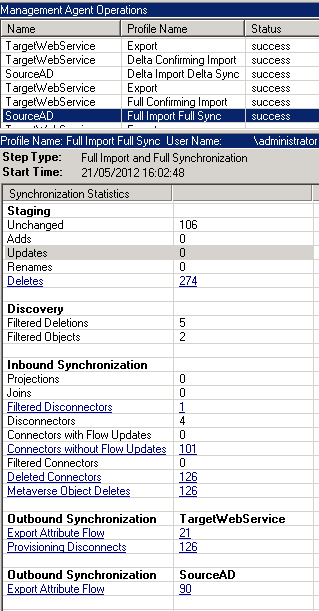
Once that operation shows has a status of "success", select "Run..." again, and this time switch to the "TargetWebService" management agent, and choose the "Full Confirming Import" run profile, and press "OK".

Once that operation also shows a status of "success", you'll want to run the "Export" profile for the "TargetWebService" management agent.

As you can see, after each run you should see confirmation of deleted accounts in the reports.
To confirm that they've really gone away, you can then fire up forced run of the standard sync using the powershell command Start-OnlineCoexistenceSync if you run the DirSyncConfigShell powershell script from the root of the DirSync install folder, or by re-running the Directory Sync Configuration Tool.
Just deleting the users from Office 365 using the Remove-MsolUser command obviously didn't work as they were just recreated again with the next diffential sync.
I also found that the event log will contain warnings that your configuration has changed and you need to perform a full sync for the changes to take effect:
The management agent "SourceAD" completed run profile "Delta Import Delta Sync" with a delta import or delta synchronization step type. The rules configuration has changed since the last full synchronization.
User Action
To ensure the updated rules are applied to all objects, a run with step type of full synchronization should be completed.
Filed under: Office365, PowerShell, Tools
There are a few blog posts out there already about setting up the SharePoint Information Worker Demo machines in a "dual boot from VHD" mode, but I found that I needed to pull a number of them together to get it all up and running to my satisfaction.
Firstly, download the latest 2010 IW Demo VM from Microsoft (at the time of writing, this was 2010-10, released 26 March 2012).
For basic SharePoint demos, you can get away with just Server A, which gives you everything except Exchange (Server B) and Lync (Server C).
This walkthrough assumes you don't have access to Hyper-V - which will have implications later on unfortunately.
Ensure you've also got yourself:
-
Optional: VirtualBox - a great little app for creating and running Virtual Machines - we're going to use this to get the basic configuration up and running before we set up the boot-to-VHD.
-
Drivers - You'll want to ensure that you have suitable drivers for a few bits of hardware - especially Graphics Cards and Wireless adaptors if you're running this on a laptop.
Configure your Virtual Machine
If you want to save yourself a little bit of pain later on, once you've downloaded and unpacked the Virtual Machine, fire up VirtualBox and create a new Windows 2008 Server. When prompted to for the hard disk, attach the one you've just unpacked.
Before firing up the VM, you need to change the hard disk from SATA to IDE otherwise you'll be bluescreening during boot:
-
Select the VM, and click on the Settings button.
-
Switch to the Storage page, and remove the VHD from under the SATA controller - make sure you KEEP the actual files when prompted.
-
Then, add a new Hard Disk under the IDE Controller (the stacked disk icon), and point it at the VHD.
You're now good to go. Fire up the VM, and log in, (using the admin password "pass@word1" - remember that it's currently using the US keyboard layout, so the @ symbol is on the 2 (or quote mark).
Let the warm-up scripts run, but don't try and view SharePoint yet, we haven't configured the networking correctly, but you should be able to open the Central Admin site to confirm things are correct.
You can either configure standalone networking now, or move on to the Dual Boot options.
Setup Networking
Open up the device manager, select the root computer node (demo2010a), and then from the Actions menu select "Add Legacy Device".
In the wizard, you want to add a "Network adapter", then select "Microsoft" from the list of manfacturers, and "Microsoft Loopback Adapter" from the list of network adapters.
Then open up the Network and Sharing Center, and go through to Configure Network Connections. Find the new adaptor (it'll have a description of "Microsoft Loopback Adapter"), right click on it, and select "Properties". Then select the "Internet Protocol Version 4 (TCP/IPv4)" item, and press the Properties button.
Set up the connection as follows:
-
Use the following IP address:
-
IP address: 192.168.150.1
-
Subnet Mask: 255.255.255.0
-
Default Gateway: Leave Blank.
-
Use the following DNS server addresses:
-
Preferred DNS sever: 192.168.150.1
And click OK. You'll then get a warning that the IP address you've entered is already assigned to another adapter (Microsoft Virtual Machine Bus Network Adaptor) which is no longer present in the computer. Select "Yes" you do want to remove the static IP configuration for the absent adapter.
You should now be able to view the empty Intranet Team site site on http://intranet/ (the default homepage of Intranet.contoso.com may not work at this point, however everything else should now be inplace, including the profiles, and search - try searching for "Tad" or "Erika".
Dual Boot
Next it's time to set up our Dual Boot setup - I've been happily following Scott Hanselman's advice on this for some time, and you should too: Less Virtual More Machine - The magic of Boot to VHD.
If you've left the VHD in the default unpacked location, there's a space in the folder path - when using bcdedit you need to ensure that the path is quoted, for example:
bcdedit /set {guid} device vhd="[C:]\VHDs\2010-10a\Virtual Hard Disks\2010-10a.vhd"
Note also that these VHDs are expandable to 125GB, and when you boot to VHD they need to be able to fully expand, even if they're not using it all - so make sure you've cleared off the .rar files, etc before continuing.
Enabling the Wireless Network
Once you're up and running, if you're on a Laptop, you'll probably want to enable the Wireless Networking Service:
The key thing to do here is to install the Feature from the Server Management view, called "Wireless LAN Service" - once that's configured, you can install your WiFi card drivers and connect to a wireless network (assuming you've configured some AV software, etc.).
Fixing the Locale
If you're like me and not based in the US, you may find typing things like the @ symbol tediously complex, in which case you will probably want to change the system locale from English (United States) to something more in line with your keyboard layout.
This is fairly easily accomplished through the "Region and Language" control panel, but don't forget to switch to the Administrative tab and copy the keyboard settings over to the "Welcome screen and new user accounts" - you'll need to restart for these changes to take effect.
Once you've done this however, you will probably notice that nickname and phonetic searching no longer work, so take a look at my short summary of helpful links for enabling SharePoint People Search.
Limitations
The core limitation that I've found with doing it this way is that the content packs aren't installed by default, and unless the VM is attached to a HyperV system you can't install them using the downloadable content packs as these work by attaching a (very) virtual DVD to the VM - and it won't work with Virtual Box or dual booted systems.
I've currently managed to get around this by ripping the content database out of an old instance of the VM (hunt around for 2010-07a) which had the content pre-configured, however I'm still missing some of the walkthrough content - most notably the KPI and Business Connectivity configuration.
Filed under: SharePoint
There are a number of useful blog posts out there that talk about applying Custom Master Pages to SharePoint Team Sites, Blogs, etc., and some, like Bugra Postaci's post, even use stapling to do this automatically.
However, at the end of the day, they all have one thing in common: They claim you need to activate the Publishing Features to do this, even when you're doing it programmatically.
Assigning custom Master Pages to Out-of-the-Box SharePoint sites without activating Publishing Features
Obviously this all needs to happen within a SharePoint project, and assumes that you've created a customised Master Page in your Master Page Gallery.
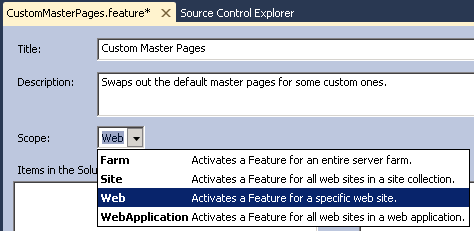
Starting from a Blank SharePoint project, that is set to "Deploy as a Farm Solution" I added a new feature, and scoped it to the "Web - Activates a Feature for a specific web site.":
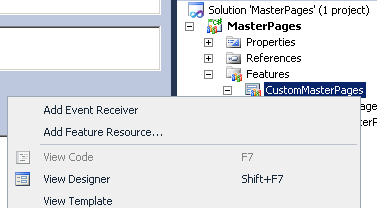
Right-click on the feature in the solution explorer, and add an event receiver:
Implement the FeatureActivated method (note that we're also setting the Site Master as well as the System Master, that way if the Publishing Features are enabled later they will be set correctly):
public override void FeatureActivated(SPFeatureReceiverProperties properties)

{

  // Get the SPWeb we're being activated in.

  var web = (SPWeb)properties.Feature.Parent;


  if (null != web) {

    // Get the Site Collection root path to get the master page gallery.

    string siteCollectionRoot = web.Site.RootWeb.Url;


    // Set the Site Master to Custom.master

    var siteMaster = new Uri(siteCollectionRoot +

                             "/_catalogs/masterpage/" +

                             "Custom.Master");

    web.CustomMasterUrl = siteMaster.AbsolutePath;


    // Set the System Master to Custom.master

    var systemMaster = new Uri(siteCollectionRoot +

                               "/_catalogs/masterpage/" +

                               "Custom.Master");

    web.MasterUrl = systemMaster.AbsolutePath;


    // Clear the Alternate CSS

    web.AlternateCssUrl = string.Empty;


    // Save the changes back to the web

    web.Update();

  }

}
And FeatureDeactivating to set things back to the default master page:
public override void FeatureDeactivating(SPFeatureReceiverProperties properties)

{

  // Get the SPWeb we're being activated in.

  var web = (SPWeb)properties.Feature.Parent;


  if (null != web) {

    // Get the Site Collection root path to get the master page gallery.

    string siteCollectionRoot = web.Site.RootWeb.Url;


    // Set both Master Pages to v4.master

    var siteMaster = new Uri(siteCollectionRoot +

                             "/_catalogs/masterpage/" +

                             "v4.master");

    web.CustomMasterUrl = siteMaster.AbsolutePath;

    web.MasterUrl = systemMaster.AbsolutePath;


    // Clear the Alternate CSS

    web.AlternateCssUrl = string.Empty;


    // Save the changes back to the web

    web.Update();

  }

}
All fairly simple so far, and once you've deployed this feature, you can activate it and it will apply your custom master pages to you team sites. As you've hopefully already guessed, these are based on the "System Master Page" - so you really need to ensure that your template is left aligned and fluid - there's a whole other post hidden in that statement I'm sure.
Automatically assigning Custom Master pages on new sites as they are created
Create another feature in your project, and this time scope it to at least "Site - Activates a Feature for all web sites in a site collection", however your milage may vary, and will depend on the setup of your Farm - if you have multiple Web Applications that don't all have this branding applied to them, then you don't want to be scoping this at the Farm level. If the majority of your Web Applications share the same branding scoping it to WebApplication and deactivating it on those Web Applications that don't use the branding might suffice.
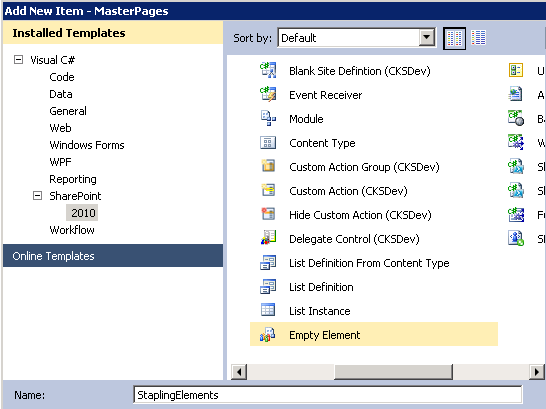
Next, add a new "Empty Element" to the project:
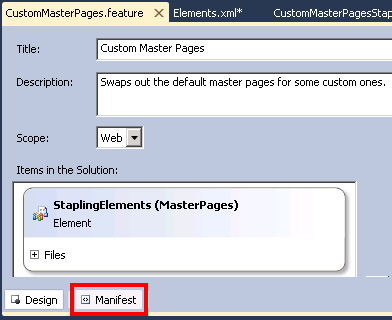
First, open the CustomMasterPages feature, and switch to the "Manifest" view to find the id of the feature:
Then in the Elements.markup add the details of the features you want to activate:
<Elements markupns="http://schemas.microsoft.com/sharepoint/">

  <FeatureSiteTemplateAssociation Id="e5f2c515-d45f-4096-a0b1-7d486a4d011a"

                        TemplateName="GLOBAL" />

</Elements>
As you can see, no Publishing Features were harmed in the making of this feature. I've set this to apply my custom Master Pages to every site template so that the users have a nice consistent branding throughout their Intranet - however you can pick and choose which ones you want here, or you could do it in code during the feature activation if (for example) you want to apply a different Master Page to the Blog Site template.
Then in the stapling feature, add the Element:

Save, deploy and test. You should now have your custom master pages in action every time you create a new site within SharePoint.
Filed under: SharePoint
While I don't do anywhere as much with 3ds Max as I should, I do like to keep learning about it and playing with it every now and again.
One of the most useful resources I've come across in a long time is Jamie Gwilliam's Blog: Jamie's Jewels. Jamie's recently been running a series of "Quick Tips" on his blog which I've found to be incredibly useful, and he also occasionally runs competitions where you can win the odd bit of Autodesk/3ds Max branded or related gear.
His last one was just a call for shots of 3ds Max jewel cases or software boxes, and luckly I had a few very old ones sitting around in the loft, having switched to digital distribution years ago. I only got around to sending a shot of the boxes to the day before the deadline, so was very happy to recieve a very nice iPhone case this week 
Anyway, follow @3dsJamiesJewels over on twitter now to find out all sorts of things about this great app.
 While it's clearly perfectly understandable to me how Doodle Grouper actually works, I'm occasionally reminded that it's not as intuitive for others as I'd like, so here's a little "How-To" guide, that covers most of the features that currently exist in 1.0.0.7.
Adding Users to a List
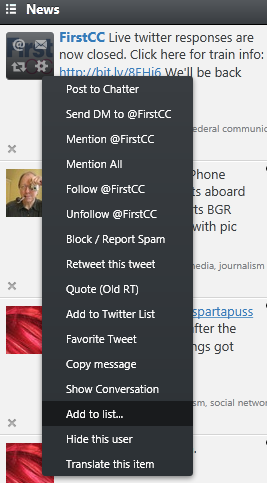
The easiest way to add a user to a list is to use the "Add to list..." action the plugin adds to the actions on the User Icon:
This brings up the "Add User To List" Dialog:
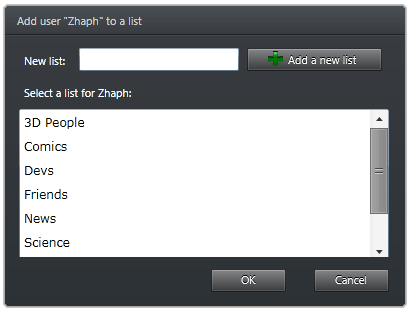
Here you can add the user to an existing List by selecting it from the list, or create a new List, press "Add a new list" and then select it and press OK.
The Lists you create with this plugin appear in the User Lists tab of Seesmic:
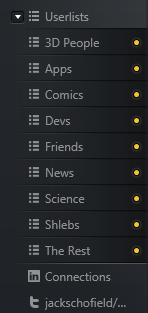
You can display or hide the columns by clicking on them - the order they appear in the main Seesmic space is determined by the order you show them.
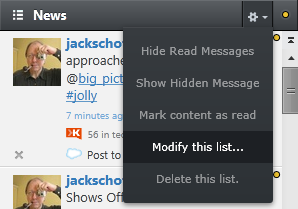
Modifying a List
Once you've displayed a list, you can modify it through the column settings, selecting "Modify this list..."
Then on the "Modify List" dialog, you can rename the list, add more users manually (it's Case Sensitive so be careful doing it this way), delete the entire list or remove a user by selecting them from the list and pressing "Update":
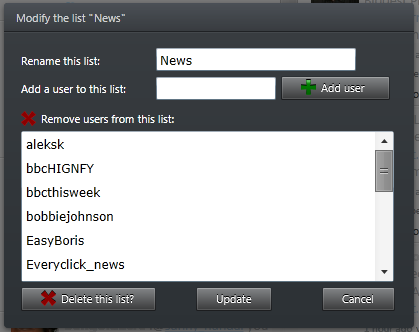
The remove function only removes one user at a time at the moment.
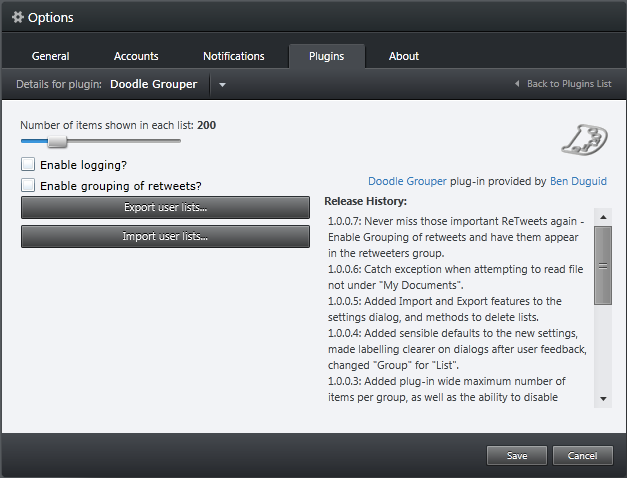
Advanced Functions
On the Settings pane for the Doodle Grouper plugin, you can import and export your lists for example for use on a different computer. While you can export the file to pretty much any location you like, note that you can only import a file from within your "My Documents" folder.
The format of the markup is as follows:
<?markup version="1.0" encoding="utf-8"?>

<ArrayOfUserList markupns:xsi="http://www.w3.org/2001/XMLSchema-instance"

                 markupns:xsd="http://www.w3.org/2001/XMLSchema">

  <UserList>

    <Name>List Name 1</Name>

    <Users>

      <string>User Name 1</string>

      <string>User Name 2</string>

    </Users>

  </UserList>

  <UserList>

    <Name>List Name 2</Name>

    <Users>

      <string>User Name 3</string>

      <string>User Name 4</string>

    </Users>

  </UserList>

</ArrayOfUserList>
I tend to leave Seesmic running, and have encountered memory issues when running with too many lists, so I added the ability to throttle the number of updates that the plugin keeps in each List.
If you "Enable logging", the plugin will add more verbose details into the Seesmic log file to tell you what it's doing.
At the time of writing (1.0.0.7) the "Enable grouping of retweets" doesn't currently work.
Filed under: Plug-ins, Seesmic
It's finally here: After 12 months of other people defining, and committing to support it, one of the latest StackExchange sites to enter public beta is LEGO Answers - Bricks.StackExchange.com*, the place to ask all your LEGO and compatible brick building questions.
This is the first time I've been really actively involved in the private beta of one of these sites - I was in the WebMasters one enough to fulfil my obligations and earn the Beta badge, but not as much as this time, so here are my thoughts on the process.
Remote collaboration is hard
Working with a group of others remotely, on a site that doesn't encourage "chatter" is hard - Chat is there, but it's not that heavily used at the moment - when what you really want to do is sit down with a few drinks and discuss some of the issues: I had to remind myself on a few occasions not to take things personally, especially as there is a large group of users for whom English isn't a first language - they're doing a lot better than I would do if the site were in German or French  , I just hope I didn't cause any offence either...
Moderation requires effort - let us help!
One of the features of StackExchange sites is that as users gain reputation, they gain access to tools and features on the site that give them more say in the running of the site - as is pointed out on the FAQs:
At the high end of this reputation spectrum there is little difference between users with high reputation and ♦ moderators. That is very much intentional. We don’t run LEGO® - Stack Exchange. The community does.
But also, during the beta phase, the reputation requirements are lowered so that the actual users rather than CHAOS moderators do most of the day to day running of the site.
During Private Beta, the reputation requirements are very low, around 1000 rep gets you access to moderation tools - by the end of private beta, we had three or four users who were just over this threshold and helping out Dori and Robert (the two mod's I've really seen around, no disrespect to Geoff, Emmett or Rebecca). Suddenly the site goes into Public Beta, and the threshold's instantly raised to 2000 rep, and a load of new users join the site (that's a good thing  ) but suddenly, it's left to Dori and Robert to manage the influx (it probably wasn't that big) of flags, suggested edits, etc., and my edits suddenly need approval again - I mean, I've proved myself already haven't I?
I guess part of this would have been resolved if the influx of users had actually been asking questions that people could answer and vote on - then the reputation would have risen fast enough to counter this - as it is, after nearly two weeks in public beta, I've nearly regained access to the moderation tools .
Conclusion
We need your help - come and ask questions - come and give better answers - and don't be put off by thinking your question is silly, or someone's edited your answer - we're here to help, and craft the best resource for LEGO Q&A's there is - we really need to increase our daily question rate for example.
As some examples, I've had some great answers to building graveyard rooms for Heroica games and building a roof with a 60º pitch, others have been trying to work out how to invert the direction of bricks so that the studs are touching.
The name may well change - The LEGO Group understandably don't want "LEGO" in the title. Vote for your choice over on the meta question: Site may not be described as LEGO Answers - call for alternative titles
Filed under: Lego, StackExhange, Websites