There are a few blog posts out there already about setting up the SharePoint Information Worker Demo machines in a "dual boot from VHD" mode, but I found that I needed to pull a number of them together to get it all up and running to my satisfaction.
Firstly, download the latest 2010 IW Demo VM from Microsoft (at the time of writing, this was 2010-10, released 26 March 2012).
For basic SharePoint demos, you can get away with just Server A, which gives you everything except Exchange (Server B) and Lync (Server C).
This walkthrough assumes you don't have access to Hyper-V - which will have implications later on unfortunately.
Ensure you've also got yourself:
-
Optional: VirtualBox - a great little app for creating and running Virtual Machines - we're going to use this to get the basic configuration up and running before we set up the boot-to-VHD.
-
Drivers - You'll want to ensure that you have suitable drivers for a few bits of hardware - especially Graphics Cards and Wireless adaptors if you're running this on a laptop.
Configure your Virtual Machine
If you want to save yourself a little bit of pain later on, once you've downloaded and unpacked the Virtual Machine, fire up VirtualBox and create a new Windows 2008 Server. When prompted to for the hard disk, attach the one you've just unpacked.
Before firing up the VM, you need to change the hard disk from SATA to IDE otherwise you'll be bluescreening during boot:
-
Select the VM, and click on the Settings button.
-
Switch to the Storage page, and remove the VHD from under the SATA controller - make sure you KEEP the actual files when prompted.
-
Then, add a new Hard Disk under the IDE Controller (the stacked disk icon), and point it at the VHD.
You're now good to go. Fire up the VM, and log in, (using the admin password "pass@word1" - remember that it's currently using the US keyboard layout, so the @ symbol is on the 2 (or quote mark).
Let the warm-up scripts run, but don't try and view SharePoint yet, we haven't configured the networking correctly, but you should be able to open the Central Admin site to confirm things are correct.
You can either configure standalone networking now, or move on to the Dual Boot options.
Setup Networking
Open up the device manager, select the root computer node (demo2010a), and then from the Actions menu select "Add Legacy Device".
In the wizard, you want to add a "Network adapter", then select "Microsoft" from the list of manfacturers, and "Microsoft Loopback Adapter" from the list of network adapters.
Then open up the Network and Sharing Center, and go through to Configure Network Connections. Find the new adaptor (it'll have a description of "Microsoft Loopback Adapter"), right click on it, and select "Properties". Then select the "Internet Protocol Version 4 (TCP/IPv4)" item, and press the Properties button.
Set up the connection as follows:
-
Use the following IP address:
-
IP address: 192.168.150.1
-
Subnet Mask: 255.255.255.0
-
Default Gateway: Leave Blank.
-
Use the following DNS server addresses:
-
Preferred DNS sever: 192.168.150.1
And click OK. You'll then get a warning that the IP address you've entered is already assigned to another adapter (Microsoft Virtual Machine Bus Network Adaptor) which is no longer present in the computer. Select "Yes" you do want to remove the static IP configuration for the absent adapter.
You should now be able to view the empty Intranet Team site site on http://intranet/ (the default homepage of Intranet.contoso.com may not work at this point, however everything else should now be inplace, including the profiles, and search - try searching for "Tad" or "Erika".
Dual Boot
Next it's time to set up our Dual Boot setup - I've been happily following Scott Hanselman's advice on this for some time, and you should too: Less Virtual More Machine - The magic of Boot to VHD.
If you've left the VHD in the default unpacked location, there's a space in the folder path - when using bcdedit you need to ensure that the path is quoted, for example:
bcdedit /set {guid} device vhd="[C:]\VHDs\2010-10a\Virtual Hard Disks\2010-10a.vhd"
Note also that these VHDs are expandable to 125GB, and when you boot to VHD they need to be able to fully expand, even if they're not using it all - so make sure you've cleared off the .rar files, etc before continuing.
Enabling the Wireless Network
Once you're up and running, if you're on a Laptop, you'll probably want to enable the Wireless Networking Service:
The key thing to do here is to install the Feature from the Server Management view, called "Wireless LAN Service" - once that's configured, you can install your WiFi card drivers and connect to a wireless network (assuming you've configured some AV software, etc.).
Fixing the Locale
If you're like me and not based in the US, you may find typing things like the @ symbol tediously complex, in which case you will probably want to change the system locale from English (United States) to something more in line with your keyboard layout.
This is fairly easily accomplished through the "Region and Language" control panel, but don't forget to switch to the Administrative tab and copy the keyboard settings over to the "Welcome screen and new user accounts" - you'll need to restart for these changes to take effect.
Once you've done this however, you will probably notice that nickname and phonetic searching no longer work, so take a look at my short summary of helpful links for enabling SharePoint People Search.
Limitations
The core limitation that I've found with doing it this way is that the content packs aren't installed by default, and unless the VM is attached to a HyperV system you can't install them using the downloadable content packs as these work by attaching a (very) virtual DVD to the VM - and it won't work with Virtual Box or dual booted systems.
I've currently managed to get around this by ripping the content database out of an old instance of the VM (hunt around for 2010-07a) which had the content pre-configured, however I'm still missing some of the walkthrough content - most notably the KPI and Business Connectivity configuration.
Filed under: SharePoint
There are a number of useful blog posts out there that talk about applying Custom Master Pages to SharePoint Team Sites, Blogs, etc., and some, like Bugra Postaci's post, even use stapling to do this automatically.
However, at the end of the day, they all have one thing in common: They claim you need to activate the Publishing Features to do this, even when you're doing it programmatically.
Assigning custom Master Pages to Out-of-the-Box SharePoint sites without activating Publishing Features
Obviously this all needs to happen within a SharePoint project, and assumes that you've created a customised Master Page in your Master Page Gallery.
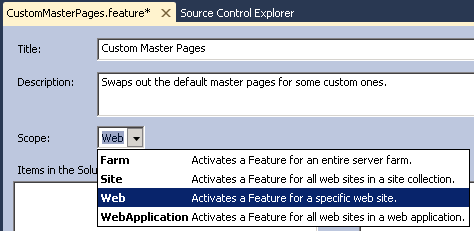
Starting from a Blank SharePoint project, that is set to "Deploy as a Farm Solution" I added a new feature, and scoped it to the "Web - Activates a Feature for a specific web site.":
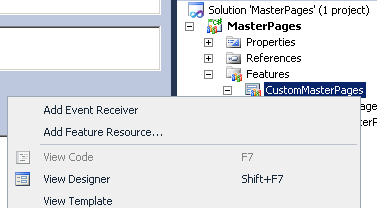
Right-click on the feature in the solution explorer, and add an event receiver:
Implement the FeatureActivated method (note that we're also setting the Site Master as well as the System Master, that way if the Publishing Features are enabled later they will be set correctly):
public override void FeatureActivated(SPFeatureReceiverProperties properties)

{

  // Get the SPWeb we're being activated in.

  var web = (SPWeb)properties.Feature.Parent;


  if (null != web) {

    // Get the Site Collection root path to get the master page gallery.

    string siteCollectionRoot = web.Site.RootWeb.Url;


    // Set the Site Master to Custom.master

    var siteMaster = new Uri(siteCollectionRoot +

                             "/_catalogs/masterpage/" +

                             "Custom.Master");

    web.CustomMasterUrl = siteMaster.AbsolutePath;


    // Set the System Master to Custom.master

    var systemMaster = new Uri(siteCollectionRoot +

                               "/_catalogs/masterpage/" +

                               "Custom.Master");

    web.MasterUrl = systemMaster.AbsolutePath;


    // Clear the Alternate CSS

    web.AlternateCssUrl = string.Empty;


    // Save the changes back to the web

    web.Update();

  }

}
And FeatureDeactivating to set things back to the default master page:
public override void FeatureDeactivating(SPFeatureReceiverProperties properties)

{

  // Get the SPWeb we're being activated in.

  var web = (SPWeb)properties.Feature.Parent;


  if (null != web) {

    // Get the Site Collection root path to get the master page gallery.

    string siteCollectionRoot = web.Site.RootWeb.Url;


    // Set both Master Pages to v4.master

    var siteMaster = new Uri(siteCollectionRoot +

                             "/_catalogs/masterpage/" +

                             "v4.master");

    web.CustomMasterUrl = siteMaster.AbsolutePath;

    web.MasterUrl = systemMaster.AbsolutePath;


    // Clear the Alternate CSS

    web.AlternateCssUrl = string.Empty;


    // Save the changes back to the web

    web.Update();

  }

}
All fairly simple so far, and once you've deployed this feature, you can activate it and it will apply your custom master pages to you team sites. As you've hopefully already guessed, these are based on the "System Master Page" - so you really need to ensure that your template is left aligned and fluid - there's a whole other post hidden in that statement I'm sure.
Automatically assigning Custom Master pages on new sites as they are created
Create another feature in your project, and this time scope it to at least "Site - Activates a Feature for all web sites in a site collection", however your milage may vary, and will depend on the setup of your Farm - if you have multiple Web Applications that don't all have this branding applied to them, then you don't want to be scoping this at the Farm level. If the majority of your Web Applications share the same branding scoping it to WebApplication and deactivating it on those Web Applications that don't use the branding might suffice.
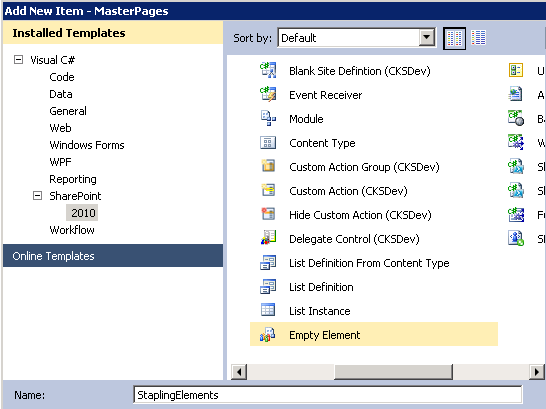
Next, add a new "Empty Element" to the project:
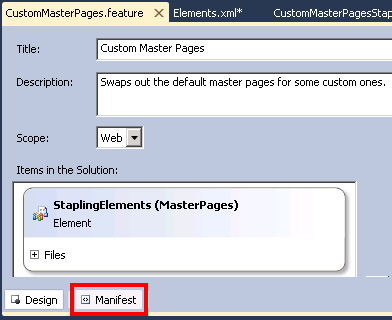
First, open the CustomMasterPages feature, and switch to the "Manifest" view to find the id of the feature:
Then in the Elements.markup add the details of the features you want to activate:
<Elements markupns="http://schemas.microsoft.com/sharepoint/">

  <FeatureSiteTemplateAssociation Id="e5f2c515-d45f-4096-a0b1-7d486a4d011a"

                        TemplateName="GLOBAL" />

</Elements>
As you can see, no Publishing Features were harmed in the making of this feature. I've set this to apply my custom Master Pages to every site template so that the users have a nice consistent branding throughout their Intranet - however you can pick and choose which ones you want here, or you could do it in code during the feature activation if (for example) you want to apply a different Master Page to the Blog Site template.
Then in the stapling feature, add the Element:

Save, deploy and test. You should now have your custom master pages in action every time you create a new site within SharePoint.
Filed under: SharePoint
There are a number of useful blog posts out there on the web that talk you through setting up SharePoint's People search correctly however the following were increadibly useful to me:
Corey Roth's "How to set up People Search in SharePoint 2010" was the most helpful for me - however I think there's something different about the instance of SharePoint I'm running:
When Corey suggests giving the Default Content Access account rights in the User Profile Service Application, I didn't have the option of "Retrieve People Data for Search Crawlers", however giving it access to "User Profile Application" and "User Profile Service Application Proxy" seems to work quite nicely*.
Also, as all my browsers are set up to be British English for preference over US English, or just English, we weren't seeing any of the Nickname or Phonetic search features that are included in SharePoint 2010.
Thanks to Kristof Kowalski's post "SharePoint Server 2010 Phonetic and Nickname Search" and the results of his support request, we were able to get this working for all our British speaking users  , and now searching for "Benjamin" will bring me back as "Ben".
Having finally installed Service Pack 1, and the June, August and October Cumulative Updates the permissions list now matches Corey's blog.
Filed under: SharePoint
This is one of those jobs that looks so simple on the outside, but can lead you down a massive rabbit hole if you're not too careful:
We're in the process of changing an instance of SharePoint from a true "Single Server" setup to having the databases on a separate SQL Server, and there's plenty of documentation about that, starting with: Move all databases
We'd also followed the recommendations in Harden SQL Server for SharePoint Environments but after we'd moved the Content Database to the new server and attached it in SQL, all attempts to "Add a content database" in Central Admin resulted in errors such as:
Cannot connect to database master at SQL server at SqlServer2. The database might not exist, or the current user does not have permission to connect to it.
Digging into the ULS logs we found the following Critical errors:
Unknown SQL Exception 53 occurred. Additional error information from SQL Server is included below. A network-related or instance-specific error occurred while establishing a connection to SQL Server. The server was not found or was not accessible. Verify that the instance name is correct and that SQL Server is configured to allow remote connections. (provider: Named Pipes Provider, error: 40 - Could not open a connection to SQL Server)
It turns out that sometimes the SQL Configuration Manager needs a little bit of a helping hand, and you need start the Old School "SQL Server Client Network Utility" with the command (note the 8.3 format of the name):
cliconfg.exe
On the Alias tab of this app, add the Aliases you added in the SQL Configuration Manager, and you should be good to go.
Filed under: SharePoint
We're in the process of moving to Team Foundation Server 2010, and as part of the process, we're updating the process template we're using, creating branded versions of the default documents, etc. Also, with new projects kicking off we're able to really sort out which process template we're using.
However, while we're ironing these changes out, we obviously need to actually do some work - so to that end we'd tweaked a template, created our project using that, and in the background we can work on the template for other projects.
This has left us with two things:
-
A number of projects in our test Project Collection with portals in the wrong place in SharePoint.
-
A number of projects using out of date portals.
At the moment, we've not made any changes to the contents in SharePoint (beyond access rights), we're mostly just using the dashboards and reports, so the cost of recreating these templates isn't that high however I was having a lot of difficulty working out how to move existing portals, or how to rebuild a portal after creating the project - the New Team Project wizard includes the option "Do not configure a SharePoint site at this time", with no real guidance on how to create one later.
As this is currently looking at WSS, and these aren't publishing sites, I can't move them easily in SharePoint. We tried exporting them, and importing them into the new location, but that also didn't work - errors about a template missing from the _forms folder (I guess the default template for the excel reports document library).
I tried creating a new site in SharePoint using the TFS templates supplied, but that didn't pick up my changes to the template, nor set up/create the shared documents, or the project dashboard. I also tried creating a dummy project with a portal in the right place, disconnecting the portal in TFS, then pointing the right project at the portal and finally deleting the dummy project, which worked, but was going to be a lot of work for all the other projects.
Finally, I took a look at the actions included in the tfpt command line tool from the Team Foundation Server Power Tools and noticed:
addprojectportal Add or move portal for an existing team project
Pass this the path to TFS, the project and process template you want to move, and optionally the details for the SharePoint instance you want to use and away it goes, creating a new Project Portal for you with all the modifications you've made.
I would point out the following issue I've had with this tool, but it may be due to my usage of it: when I pointed this at a project that already had a portal, I expected the tool to move the portal for me, however (probably because the project was built using a different Process Template) I now have two portals for this project, the old one, and the new one, not a big deal, I can easily delete the old portal - TFS seems to be happily pointing at the new one.
Running it without the /verbose option seemed to fail - and the logs weren't very helpful. Running the same command with /verbose resulted in a successful run. I may have just been unlucky.
Morals of this post:
-
Always check the power tools first.
-
MS have a habit of not finishing things, and releasing the bits you actually need as power tools.
-
Mario Rodriguez rocks.
Filed under: SharePoint