I recently had to put together an Azure DevOps Pipeline to manage deployments of a new Sitecore XM Cloud project with Vercel hosted front-end. Much of the quick start documentation for both XM Cloud and Vercel basically say "Connect to your source control (ideally GitHub) and you're good to go". Clearly great for standing something up quickly but misses a number of important steps:
- Is the code suitable? Does it compile, do the tests pass, have we introduced issues through new dependencies - all of this should be checked before we even think about deploying it somewhere.
- Do things need to happen in sequence? Does the model that the front-end headless app uses need to exist on the API before it can run? In the quick start recommendations both the Sitecore and Vercel deployments would kick off simultaneously, and sometimes that would cause problems if core models hadn't been published to the Experience Edge before the pages were being built.
- Is the team ready for it? If deployments happen whenever new code is available, there's a high likelihood that the environment will restart or change while teams are working on it.
- Do we want a single source of truth for what's deployed where? If deployments are triggered as branches are updated, pulled directly through the Sitecore Deploy App or triggered in Vercel, how can we easily see what's been deployed where, tag releases, etc.?
There are always going to be a number of different solutions to these possible issues, but as we're running the project through Azure DevOps, Pipelines was the option I chose.
The Pipeline Templates
I've built the pipeline from a set of reusable modules to reduce the repetition within the pipeline, and also allow us to have a dedicated "PR Checks" pipeline that just focuses on building and testing PRs, but not have to worry about conditions to limit deployments, etc. - I'm just calling out the templates specific to deploying your application to Sitecore XM Cloud and Vercel here, assuming you'll want to ensure your build and test stages meet your requirements.
Setup Sitecore CLI
Takes parameters XmCloudClientId, XmCloudClientSecret
Ensures the build agent is running dotnet 6.0, installs the Sitecore CLI, confirms the version number and plugins, and then logs into Sitecore Cloud and confirms the available projects (always good to confirm that you have what you're expecting!).
parameters:
- name: XmCloudClientId
  type: string
- name: XmCloudClientSecret
  type: string

steps:
- task: UseDotNet@2
  displayName: 'Use .NET Core sdk 6.0.x'
  inputs:
    packageType: sdk
    version: 6.0.x

- task: Bash@3
  displayName: 'Install Sitecore CLI'
  inputs:
    targetType: inline
    script: |
      dotnet tool restore
      dotnet sitecore --version
      dotnet sitecore plugin list

- task: Bash@3
  displayName: 'Login to Sitecore CLI'
  inputs:
    targetType: inline
    script: |
      dotnet sitecore cloud login --client-credentials --client-id ${{ parameters.XmCloudClientId }} --client-secret ${{ parameters.XmCloudClientSecret }} --allow-write
      dotnet sitecore cloud project list
Setup Vercel CLI
Takes optional parameter: VercelCliVersion
Ensures the build agent is using a recent version of node, and then installs the Vercel CLI and confirms the version number.
parameters:
- name: 'VercelCliVersion'
  type: 'string'
  default: ''

steps:
- task: UseNode@1
  displayName: 'Setup Node.js'
  inputs:
    version: 18.x

- task: bash@3
  displayName: 'Install Vercel CLI'
  inputs:
    targetType: 'inline'
    script: |
      npm install -g vercel${{ parameters.VercelCliVersion }}
      vercel --version
Deploy XM Cloud
Takes parameters: XmCloudEnvironmentId
Deploys the current working directory to XM Cloud via the Sitecore CLI cloud plugin. Once it's succeeded, store the deployment ID in an output variable for later use.
parameters:
- name: XmCloudEnvironmentId
  type: string

steps:
- task: Bash@3
  displayName: 'Deploy Project to XM Cloud'
  name: deployXmCloud
  inputs:
    targetType: inline
    script: |
      echo Deploying to XM Cloud
      result=$(dotnet sitecore cloud deployment create --environment-id ${{ parameters.XmCloudEnvironmentId }} --upload --json)
      echo $result
      isTimedOut=$(echo $result | jq ' .IsTimedOut')
      isCompleted=$(echo $result | jq ' .IsCompleted')
      deploymentId=$(echo $result | jq ' .DeploymentId')
      echo "##vso[task.setvariable variable=deploymentId;isOutput=true]$deploymentId"
      if [ $isTimedOut = true ]
      then
          echo "Operation Timed Out."
          exit -1
      fi
      if ! [ $isCompleted = true ]
      then
          echo "Operation Failed."
          exit -1
      fi
      echo "Deployment Completed"
Deploy Vercel
Takes parameters: VercelToken, VercelProjectId, VercelTeamId
When working with an account that's a member of multiple teams, your common token needs to used with a Team Id to ensure correct scoping.
Triggers a deployment to Vercel from the current working directory.
parameters:
- name: VercelToken
  type: string
- name: VercelProjectId
  type: string
- name: VercelTeamId
  type: string

steps:
- task: bash@3
  displayName: 'Deploy Front End to Vercel Production'
  inputs:
    targetType: 'inline'
    script: |
      vercel deploy --prod --token ${{ parameters.VercelToken }}
  env:
    VERCEL_ORG_ID: ${{ parameters.VercelTeamId }}
    VERCEL_PROJECT_ID: ${{ parameters.VercelProjectId }}
Deploy XM Cloud Promote
Takes parameters: XmCloudEnvironmentId, XmCloudDeploymentId
Promotes an existing Sitecore XM Cloud deployment to a new environment. On success, stores the deployment ID as an output parameter for later use.
 parameters:
- name: XmCloudEnvironmentId
  type: string
- name: XmCloudDeploymentId
  type: string

steps:
- task: Bash@3
  displayName: 'Promote Project to Next Environment in XM Cloud'
  name: promoteXmCloud
  inputs:
    targetType: inline
    script: |
      echo Promoting environment in XM Cloud
      result=$(dotnet sitecore cloud environment promote --environment-id ${{ parameters.XmCloudEnvironmentId }} --source-id ${{ parameters.XmCloudDeploymentId }} --json)
      echo $result
      isTimedOut=$(echo $result | jq ' .IsTimedOut')
      isCompleted=$(echo $result | jq ' .IsCompleted')
      deploymentId=$(echo $result | jq ' .DeploymentId')
      echo "##vso[task.setvariable variable=deploymentId;isOutput=true]$deploymentId"
      echo "Deployment Completed"
The Finished Pipeline
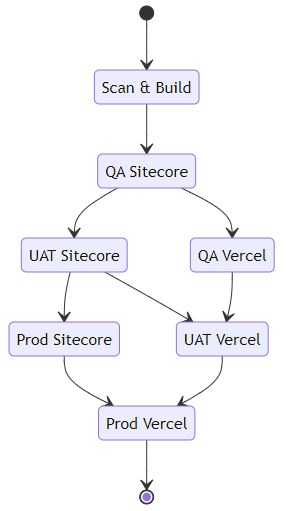
By setting the pipeline up with these discreet stages, we're able to easily extend or adjust the pipeline, as well as add other stages as needed (for example deploying a Design System version of the front-end application to document components and styles), as well as running a manual release that only deploys the Sitecore components, or the headless Vercel application.
Because both Sitecore XM Cloud and Vercel really want to perform the build process for you (indeed, next.js seems to require a build per environment, with environment variables often baked in to the application in addition to the static page generation requiring this), we aren't able to create a single build package and store that with the release, however XM Cloud does at least allow us to "promote" a deployment to a new environment after the initial deployment, which is close enough for now - you'll also notice that we need to supply a large set of environment variables to the build-node template - these are typically the environment variables that you'd set that allow the Sitecore JSS next.js application to communicate with a Sitecore instance and generate the various parts that are required to build the headless application.
We have libraries set up to hold the various parameters and secrets used throughout - if you ensure you set your secrets as secrets in the library, the Pipeline runtime takes care of not exposing those values in logs, etc. which is nice.
Environments can be configured with approvals and checks, allowing us to gate deployments pending team readiness - no more uncontrolled deployments into QA as soon as a PR is changed, meaning they can release code when they've finished testing the current crop of features in a stable environment.
trigger:
  branches:
    include:
    - develop
    - release/*
  paths:
    exclude:
    - .github/**
    - .vscode/**
    - docker/**
    - poc/**

parameters:
- name: VercelCliVersion
  type: string
  default: '@latest'

variables:
- group: XMC-Build

name: $(BuildPrefix)$(Rev:r)

- stage: ScanAndBuild
  jobs:
  - job: XmCloudBuild
    displayName: 'Scan and Build the XM Cloud Application'
    pool:
      vmImage: 'windows-latest'
    steps:
    - checkout: self
      clean: true
    - template: /.azuredevops/templates/build/build-dotnet.yml
      parameters:
        BuildConfiguration: 'Release'

  - job: FrontendBuild
    displayName: 'Scan and Build the Frontend applications'
    pool:
      vmImage: 'ubuntu-latest'
    variables:
    - group: XMC-Dev
    steps:
    - checkout: self
      clean: true

    - template: /.azuredevops/templates/build/build-node.yml
      parameters:
        GraphQlEndpoint: $(GraphQlEndpoint)
        JSSAppName: $(JSSAppName)
        NextPublicCdpKey: $(NextPublicCdpKey)
        NextPublicCdpPos: $(NextPublicCdpPos)
        NextPublicCdpTargetUrl: $(NextPublicCdpTargetUrl)
        NextPublicUrl: $(NextPublicUrl)
        SitecoreApiKey: $(SitecoreApiKey)
        SitecoreApiHost: $(SitecoreApiHost)
        SitecoreEdgeContextId: $(SitecoreEdgeContextId)
        SitecoreSiteName: $(SitecoreSiteName)
        XmCloudEnvId: $(XmCloudEnvironmentId)

    - template: /.azuredevops/templates/build/build-storybook.yml

- stage: QaSitecore
  dependsOn:
  - ScanAndBuild
  condition: and(succeeded(), or(startsWith(variables['Build.SourceBranch'], 'refs/heads/develop'), startsWith(variables['Build.SourceBranch'], 'refs/heads/release/'), startsWith(variables['Build.SourceBranch'], 'refs/heads/hotfix/')))
  variables:
  - group: XMC-QA
  jobs:
  - deployment: QaSitecore
    displayName: 'Deploy Sitecore to QA'
    environment: 'XMC-QA'
    pool:
      vmImage: 'ubuntu-latest'
    strategy:
      runOnce:
        deploy:
          steps:
          - checkout: self
            clean: true

          - template: /.azuredevops/templates/utils/setup-sitecore-cli.yml
            parameters:
              XmCloudClientId: $(XmCloudClientId)
              XmCloudClientSecret: $(XmCloudClientSecret)

          - template: /.azuredevops/templates/deploy/deploy-xmcloud.yml
            parameters:
              XmCloudEnvironmentId: $(XmCloudEnvironmentId)

- stage: QaVercel
  dependsOn:
  - QaSitecore
  condition: and(succeeded(), or(startsWith(variables['Build.SourceBranch'], 'refs/heads/develop'), startsWith(variables['Build.SourceBranch'], 'refs/heads/release/'), startsWith(variables['Build.SourceBranch'], 'refs/heads/hotfix/')))
  variables:
  - group: XMC-QA
  jobs:
  - deployment: QaVercel
    displayName: 'Deploy Vercel to QA'
    environment: 'XMC-QA'
    pool:
      vmImage: 'ubuntu-latest'
    strategy:
      runOnce:
        deploy:
          steps:
          - checkout: self
            clean: true

          - template: /.azuredevops/templates/utils/setup-vercel-cli.yml
            parameters:
              VercelCliVersion: ${{ parameters.VercelCliVersion }}

          - template: /.azuredevops/templates/deploy/deploy-vercel.yml
            parameters:
              VercelProjectId: $(VercelProjectId)
              VercelToken: $(VercelToken)
              VercelTeamId: $(VercelTeamId)

- stage: UatSitecore
  dependsOn:
  - ScanAndBuild
  - QaSitecore
  condition: and(succeeded(), or(startsWith(variables['Build.SourceBranch'], 'refs/heads/release/'), startsWith(variables['Build.SourceBranch'], 'refs/heads/hotfix/')))
  variables:
  - name: QaDeploymentId
    value: $[stageDependencies.QaSitecore.QaSitecore.outputs['QaSitecore.deployXmCloud.deploymentId']]
  - group: XMC-UAT
  jobs:
  - deployment: UatSitecore
    displayName: 'Promote Sitecore to UAT'
    environment: 'XMC-UAT'
    pool:
      vmImage: 'ubuntu-latest'
    strategy:
      runOnce:
        deploy:
          steps:
          - checkout: self
            clean: true

          - template: /.azuredevops/templates/utils/setup-sitecore-cli.yml
            parameters:
              XmCloudClientId: $(XmCloudClientId)
              XmCloudClientSecret: $(XmCloudClientSecret)

          - template: /.azuredevops/templates/deploy/deploy-xmcloud-promote.yml
            parameters:
              XmCloudEnvironmentId: $(XmCloudEnvironmentId)
              XmCloudDeploymentId: $(QaDeploymentId)

- stage: UatVercel
  dependsOn:
  - UatSitecore
  - QaVercel
  condition: and(succeeded(), or(startsWith(variables['Build.SourceBranch'], 'refs/heads/release/'), startsWith(variables['Build.SourceBranch'], 'refs/heads/hotfix/')))
  variables:
  - group: XMC-UAT
  jobs:
  - deployment: UatVercel
    displayName: 'Deploy Vercel to UAT'
    environment: 'XMC-UAT'
    pool:
      vmImage: 'ubuntu-latest'
    strategy:
      runOnce:
        deploy:
          steps:
          - checkout: self
            clean: true

          - template: /.azuredevops/templates/utils/setup-vercel-cli.yml
            parameters:
              VercelCliVersion: ${{ parameters.VercelCliVersion }}

          - template: /.azuredevops/templates/deploy/deploy-vercel.yml
            parameters:
              VercelProjectId: $(VercelProjectId)
              VercelToken: $(VercelToken)
              VercelTeamId: $(VercelTeamId)

- stage: ProdSitecore
  dependsOn:
  - ScanAndBuild
  - QaSitecore
  - UatSitecore
  condition: and(succeeded(), or(startsWith(variables['Build.SourceBranch'], 'refs/heads/release/'), startsWith(variables['Build.SourceBranch'], 'refs/heads/hotfix/')))
  variables:
  - name: UatDeploymentId
    value: $[stageDependencies.UatSitecore.UatSitecore.outputs['UatSitecore.promoteXmCloud.deploymentId']]
  - group: XMC-Prod
  jobs:
  - deployment: ProdSitecore
    displayName: 'Promote Sitecore to Prod'
    environment: 'XMC-Prod'
    pool:
      vmImage: 'ubuntu-latest'
    strategy:
      runOnce:
        deploy:
          steps:
          - checkout: self
            clean: true

          - template: /.azuredevops/templates/utils/setup-sitecore-cli.yml
            parameters:
              XmCloudClientId: $(XmCloudClientId)
              XmCloudClientSecret: $(XmCloudClientSecret)

          - template: /.azuredevops/templates/deploy/deploy-xmcloud-promote.yml
            parameters:
              XmCloudEnvironmentId: $(XmCloudEnvironmentId)
              XmCloudDeploymentId: $(UatDeploymentId)

- stage: ProdVercel
  dependsOn:
  - ProdSitecore
  - UatVercel
  condition: and(succeeded(), or(startsWith(variables['Build.SourceBranch'], 'refs/heads/release/'), startsWith(variables['Build.SourceBranch'], 'refs/heads/hotfix/')))
  variables:
  - group: XMC-Prod
  jobs:
  - deployment: ProdVercel
    displayName: 'Deploy Vercel to Prod'
    environment: 'XMC-Prod'
    pool:
      vmImage: 'ubuntu-latest'
    strategy:
      runOnce:
        deploy:
          steps:
          - checkout: self
            clean: true

          - template: /.azuredevops/templates/utils/setup-vercel-cli.yml
            parameters:
              VercelCliVersion: ${{ parameters.VercelCliVersion }}

          - template: /.azuredevops/templates/deploy/deploy-vercel.yml
            parameters:
              VercelProjectId: $(VercelProjectId)
              VercelToken: $(VercelToken)
              VercelTeamId: $(VercelTeamId)
Filed under: Azure, DevOps, Next.js, Sitecore, Vercel
In my last post I talked about hosting a Next.js app on Azure Web Apps, and I was asked why I didn't use Static Web Apps
Out of curiosity, is there a reason that you chose to go AppService over Static Web Apps (which has native Next.js support)?
Aaron Powell
Which is good question, the main answer to which is that we like to ensure that what we deploy has been fully tested, barring any configuration changes - we build the application once and then deploy that single package to every environment - static web apps supports this for a number of application styles, but sadly not for Next.js apps at this time - from the linked article on the feature:
During the preview, the following features of Static Web Apps are unsupported for Next.js with server-side rendering: […] skip_app_build and skip_api_build can't be used.
However, I do like the Static Web Apps offer, so we've been using them for a few landing pages recently and we recently had a need to front a secured API call, which is where this post comes in.
The Problem: We have a Static Web App that needs to call an API with a key, and we don't want that key (or indeed the API endpoint) exposed to the end users. We also want to follow our usual build and deploy process, with a single build that is deployed to each environment, and as an additional benefit if we can enable Password Protection on both the site and the API, that would be great.
Managed Functions to the Rescue!
The primary way to hide the key and endpoint of the API is by using an intermediary API - to hide the key, it must be stored server side, and added to the request. I considered using Front Door to add the header to requests, but that would still expose an additional URL I didn't really want to use, so using a function app seemed like a better way to go. Having this as a Managed Function answered two of my asks:
- It keeps everything on the same site and domain (all functions are under the
/api/ route).
- Password Protection is enabled for the
/api/ route as well as the site pages.
However, when I initially tried to pre-build and deploy the function application, the builds failed with:
Cannot deploy to the function app because Function language info isn't provided.
Which was a little annoying.
The answer to this is on the Build Configuration documentation under Skip building the API:
If you want to skip building the API, you can bypass the automatic build and deploy the API built in a previous step.
Steps to skip building the API:
- In the
staticwebapp.config.json file, set apiRuntime to the correct runtime and version. Refer to Configure Azure Static Web Apps for the list of supported runtimes and versions.
- Set
skip_api_build to true.
- Set
api_location to the folder containing the built API app to deploy. This path is relative to the repository root in GitHub Actions and cwd in Azure Pipelines.
So, adding the following into our staticwebapp.config.json was the final piece in the puzzle:
{
  "platform": {
    "apiRuntime": "dotnet:6.0"
  }
}
So now I can create a single build package, apply variable replacements to the appSettings.Production.json file for the function app to provide sandbox/production endpoints and keys, and have the API protected in the same way as the static site.
Filed under: Azure, DevOps
We've started using Storybook for a few of the sites we're pulling together at work, while continuing to use Azure DevOps and deploying into our Azure estates. Running a simple static app produced from a Next.js site is pretty straightforward, but it turns out that running a full Next.js application on Azure App Service has a few less than obvious hoops you need to jump through to get everything lined up and working.
The key to solving this was the "With Docker" example, which provided a decent working point to compare what we had, and what we need.
Configure Next.js Output: Standalone
The main requirement is to ensure that your next.js application is configured to output as a Standalone application. In next.config.js, ensure you've set:
module.exports = {
  output: 'standalone',
}
This will create two core folders in the .next output folder:
standalone - This is the self contained application, including the required node_modules packages, along with a minimal server.js file which can be used instead of next start.static - This is the standard static site which needs to be deployed as well.
Finally, you also have your existing public folder.
Set up your App Service
We created a Linux based App Service Plan, in our case a B1 instance.
The App Service is configured with:
- Stack:
Node
- Major version:
Node 16
- Minor version:
Node 16 LTS
- Startup Command: Provided by deployment
Everything else as you would normally configure it (e.g. FTP disabled, HTTP 2.0, HTTPS Only On, Minimum TLS Version 1.2, etc.).
Build and Deployment
Using Azure DevOps pipelines the following tasks will create a deployable package:
- stage: Build
  jobs:
  - job: NextBuild
    pool:
      vmImage: ubuntu-latest

    steps:
    - script: |
        yarn install --frozen-lockfile
      workingDirectory: $(Build.SourcesDirectory)
      env:
        CI: true
      displayName: "Installing packages"

    # Assumes output: 'standalone' configured on the next.config.
    - script: |
        yarn build
      workingDirectory: $(Build.SourcesDirectory)
      env:
        CI: true
        NODE_ENV: "production"
      displayName: "Building Next application"

    - task: CopyFiles@2
      inputs:
        sourceFolder: $(Build.SourcesDirectory)/.next/standalone
        contents: |
          **/*
        targetFolder: $(Build.ArtifactStagingDirectory)/site-deploy
      displayName: 'Copy standalone into the root'

    - task: CopyFiles@2
      inputs:
        sourceFolder: $(Build.SourcesDirectory)/.next/static
        contents: |
          **/*
        targetFolder: $(Build.ArtifactStagingDirectory)/site-deploy/.next/static
      displayName: 'Copy static into the .next folder'

    - task: CopyFiles@2
      inputs:
        sourceFolder: $(Build.SourcesDirectory)/public
        contents: |
          **/*
        targetFolder: $(Build.ArtifactStagingDirectory)/site-deploy/public
        flattenFolders: false
      displayName: 'Copy Public folder'

    - task: ArchiveFiles@2
      inputs:
        rootFolderOrFile: $(build.artifactStagingDirectory)/site-deploy
        includeRootFolder: false
        archiveType: "zip"
        archiveFile: $(Build.ArtifactStagingDirectory)/Nextjs-site.zip
        replaceExistingArchive: true
      displayName: "Package Next application"

    - task: PublishPipelineArtifact@1
      inputs:
        artifactName: Nextjs-site
        targetPath: $(Build.ArtifactStagingDirectory)/Nextjs-site.zip
      displayName: "Publish Next Application artifact"
Obviously you'll need to update the workingDirectory and sourceFolder paths as appropriate to your repo.
Basically, the steps are:
- Restore your packages
- Build your application
- Copy the contents of the
.next/standalone folder into the root of a staging folder
- Copy the contents of the
.next/static folder into the same folder within the staging folder
- Copy the content of the
public folder into the same folder within the staging folder
- Create a zip archive of the staging folder, without including the root folder
- Publish the archive as a Pipeline Artifact
The published artifact should now contain the following structure:
+ /.next
¦ + /server
¦ ¦ + /chunks
¦ ¦ + /pages
¦ + /static
¦   + /chunks
¦   + /[hash]
+ /node_modules
+ /public
+ .env
+ package.json
+ server.js
Deployment is simply a case of deploying this package with the AzureWebApp task:
- stage: Deploy
  dependsOn: Build
  condition: and(succeeded())
  jobs:
  - deployment: NextJs
    environment: "QA"
    strategy:
      runOnce:
        deploy:
          steps:
          - task: AzureWebApp@1
            inputs:
              appType: webAppLinux
              azureSubscription: azureRMServiceConnection
              appName: NextWebAppName
              package: $(Pipeline.Workspace)/Nextjs-site.zip
              deploymentMethod: "zipDeploy"
              runtimeStack: 'Node|16-lts'
              startupCommand: 'node server.js'
            displayName: "Deploy site to Azure"
The important settings to call out are:
appType - Needs to be set to webAppLinux so that we can use the startupCommand.runtimeStack - Allows the development team to adjust the major and minor versions if necessary for their specific build.startupCommand - Needs to be set to node server.js. This tells the App Service container to call the server.js file from node, starting your application ready to receive requests.
And with that, you should now have a NextJS application running on a Linux based Azure App Service.
Filed under: Azure, DevOps, Next.js
I've been playing around with OBS recently, and having fun pushing various tools to their limits.
One that I've found is great, but suffering a little from lack of documentation is Animated Lower Thirds with Dockable Control Panel , so I thought I'd post a few helpful notes.
Setting up
As of OBS 27.2 and above, the browser source needs to be loaded as a URL, rather than a local file. The simplest way to do this is open the lower thirds\browser-source.html file in a browser, and copy the path from the address bar. You should end up with a URL like:
file:///C:/Users/.../OBS-Scripts/Animated-Lower-Thirds/lower%20thirds/browser-source.html
General
Often, the tool won't do anything if certain fields are empty. Usually adding a space to a field you want to leave blank is sufficient.
To clear a memory slot, press and hold the slot you wish to clear, it will flash red and then clear.
Fonts
The video tutorials show how to import Google Fonts into the tool, but sometimes you want to use a font you've purchased and installed on you machine. Referencing these is actually fairly easy as the browser control is running the HTML page locally on your machine:
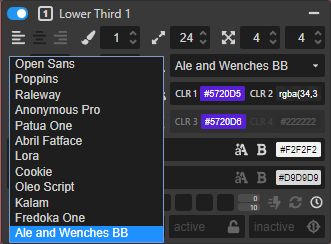
- Expand the Main Settings section, and "Show more" so you can see the three buttons.
- Select "Customs"
- For the custom font fill it in as:
Font Family: font-family: 'Ale and Wenches BB', serif;
@import url: (single space)
It's important to include the , serif or similar in the font family field otherwise the font name displays as ' in the other editors

You should then see your local font appear as an option to select in the lower third controls - remember that they don't appear in alphabetical order

Filed under: obs-studio, Streaming
I've just had to recreate a number of accounts on a windows PC, and came up against a fairly niche problem:
My family have Live "Personal" accounts that are tied to their primary email addresses, rather than to a hotmail.com or outlook.com account. My webhost provides a nice email service that supports secure IMAP connections for their accounts, so there was no need to set up full mail accounts, but we do use the calendar and contacts options, which are also managed on our phones, and shared between us. However, it's been getting slightly harder to add the live accounts to the desktop version of Outlook, hence this post.
Previously, I'd succeeded by adding the live account first, but that started failing after my host upgraded their systems and started supporting the autodiscover protocols, however I'd been able to create the account as an Exchange Enabled account, and point it to a hotmail.com server, however trying both that and using outlook.live.com seemed to connect successfully, but didn't actually bring down any contacts or calendar information.
I did manage to get it work once I'd found the underlying account that outlook.com had generated for the user. If you log in to outlook.com and hover over the Outlook icon in the top left, you're shown the details of the account - this was an email like outlook_[...]@outlook.com:
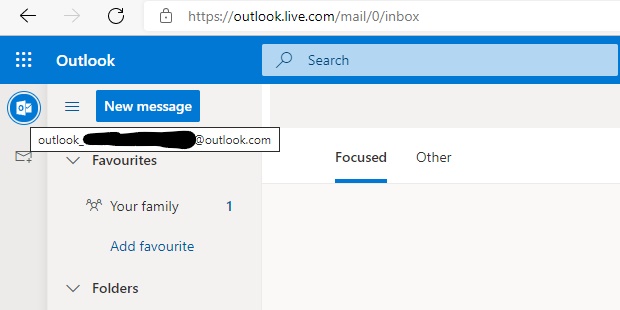
Using that email address, I was able to get the New Account dialog to recognise that I was adding an outlook.com account, but it complained that there wasn't a user with that email address. Entering the users actual email address and credentials added the account with the Calendars and Contacts to Outlook and then I could add the primary email account from our servers after that.
Filed under: Office365, outlook
Azure Front Door is a great product, that has only improved since it's initial release. At a high level it wraps three core services that most websites can benefit from: Caching (CDN), Routing (both simple Traffic Manager style and more complex rules based) and Firewalls (WAF). It also works really well behind the bigger full featured CDN offerings when you need more complex caching rules. It's easy to lock down an App Service to the Front Door infrastructure, providing you with the benefits of Web Application Firewall and failover if that's what you need.
However we recently had the following issue with Azure Front Door, caching and cookies: For sites where Front Door has Caching enabled, Front Door was stripping the set-cookie header from responses. This was causing form validation to fail when the Request Verification Token cookie wasn't returned in the POST.
Based on the documentation around cache expiration:
Cache-Control response headers that indicate that the response won't be cached such as Cache-Control: private, Cache-Control: no-cache, and Cache-Control: no-store are honoured.
We had ensured that our pages were sending Cache-Control: no-cache and were seeing x-cache: TCP_MISS on the responses so we thought we were good, but the cookies weren't being set. Checking the origin, they were being set fine, and disabling caching in Front Door resulted in them being set as expected as well, but none of the site was then cached.
Here's where the limitations of Front Door, compared to Azure Premium CDN show - the new Rules engine in Front Door allows you to modify responses, routing and caching behaviour, but only based on the incoming request (Azure Premium from Verizon CDN rules engine also allows you to modify those things based on the incoming request as well as the response from the server). So as an initial work around we disabled caching, and then enabled it with a rule for requests that included a file extension:
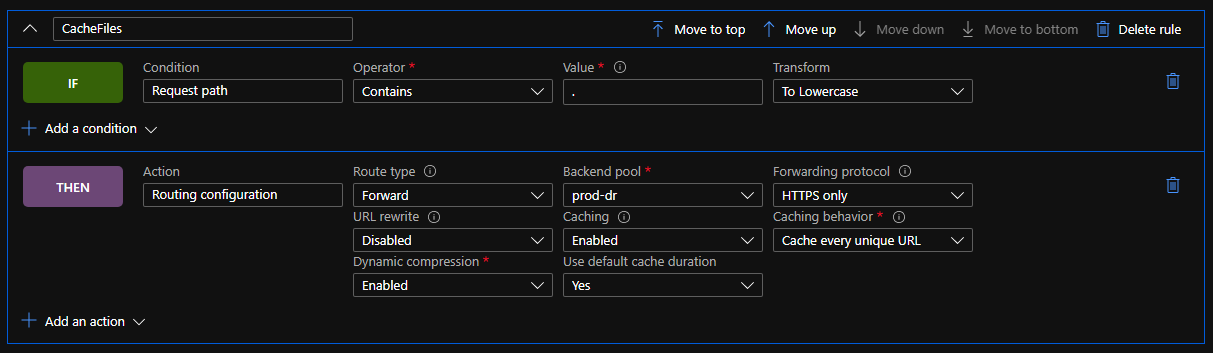
In psuedo-code:
IF Condition: "Request Path"
   Operator: "Contains"
   Value: "." Transform: "To Lowercase"
THEN Action: "Routing Configuration"
     Route Type: "Forward" "Backend Pool"
     Backend Pool: // Update as needed
     Forwarding Protocol: // Update as needed
     URL Rewrite: // Update as needed
     Caching: "Enabled"
     Cache behaviour: "Cache every unique URL" // We want cache busting query strings to work
     Dynamic compression: "Enabled"
     Use default cache duration: "Yes"
This gave us a level of caching for static content (CSS, JS, images, etc.) but still meant that cacheable pages were not being cached.
After a bit of to and fro with the very helpful support team, it was pointed out that the HTTP specification has this to say about Cache Headers:
The "no-cache" response directive indicates that the response MUST NOT be used to satisfy a subsequent request without successful validation on the origin server
And the MDN documentation spells it out even plainer:
no-cache The response may be stored by any cache, even if the response is normally non-cacheable. However, the stored response MUST always go through validation with the origin server first before using it.
Because pages with a response of "no-cache" may actually be cached, Front Door automatically strips the set-cookie header from the response, ensuring that the page can be cached and other users don't share the set-cookie header.
What we needed to do was use the Cache-Control: no-store on those pages, which results in a truly non-cacheable page, and then Front Door lets the cookies through.
This basically meant changing our code from:
Response.Cache.SetCacheability(HttpCacheability.NoCache);
To:
Response.Cache.SetNoStore();
Your page will then emit a cache control header with private, no-store and an expires header set to -1. While this does help you fall into the pit of success, it's a little tedious that No Store doesn't exist on the HttpCacheability enum, and that attempting to set the cacheability manually to no-store results in an exception.
Filed under: Azure
l recently had a requirement to add Azure Active Directory authentication to a client's Umbraco Back Office, with the added request of managing the CMS group membership via Azure AD as well.
To do this, we're going to use an Azure AD Application Registration, with some custom roles - by using roles we remove the need to share more information about the User and their memberships with our application, and we make the application more portable - we can deploy the application manifest into any directory and the same role names are returned to the calling web site, rather than a unique group ID, and because they are textual names we can also easily wire up our Umbraco group aliases to the role names, without working with unwieldy GUIDs (Umbraco also requires that a group alias doesn't start with a number).
When following through Shazwazza's post Configuring Azure Active Directory login with Umbraco, I ran into a couple of problems with the basic set-up mainly that the Token ID wasn't included in the responses, and then that the users email address wasn't populating in the generated claim correctly.
Start by installing the UmbracoCms.IdentityExtensions.AzureActiveDirectorypackage into a suitable project in your solution. This will add some dependencies and a few sample classes in either an app_start or the app_code folder depending on your project type, however these consist of two classes with OWIN startup attributes and a couple of helper methods so you could move them if needed. These classes are very well documented, so it should be fairly easy to see what's happening in there - we'll come back to them in a short while.
Then jump over to Azure, where you'll need permissions to create Applications and Enterprise Applications at least.
Open the Azure Active Directory blade for the subscription you are connecting to, and select "App Registrations" and then "New registration":
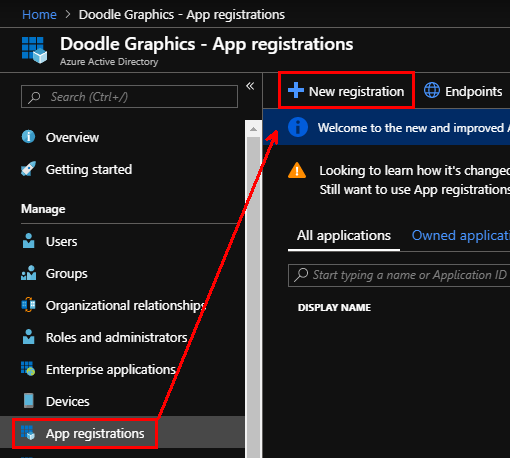
As we're granting users access to the back office we'll stick with the default of "Accounts in this organisational directory only", and as the name of the application will be shown to users if they have to grant access to their data make it meaningful (you can change it later). Finally add your first "Redirect URI" (if you have more environments that you want to control with a single application we can add these later) - this should be the full path to your Umbraco instance, including the trailing slash:
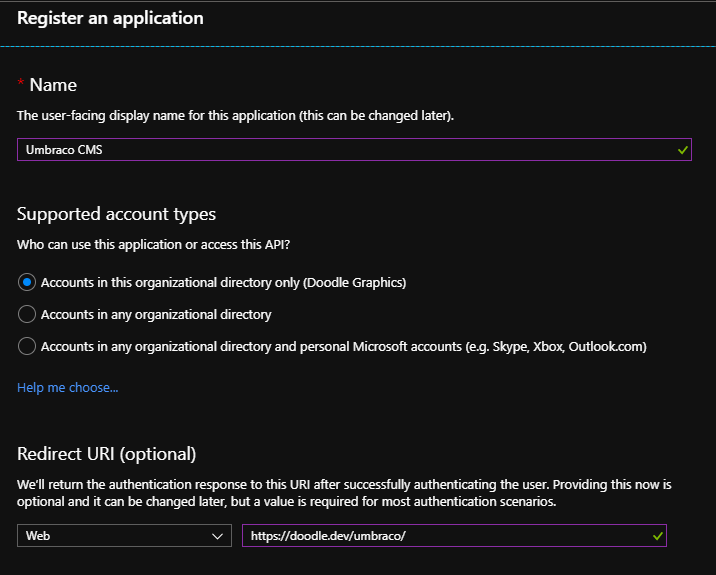
Note: This area has been improved recently so these screenshots may be slightly out of date
Press "Register" and your application will be created.
Switch to the "Authentication" pane for your new App - you need to enable "ID tokens" in the Advanced Settings - "Implicit grant" section. If you have more than one environment you're protecting with same users, you can also add the additional Redirect URIs here.

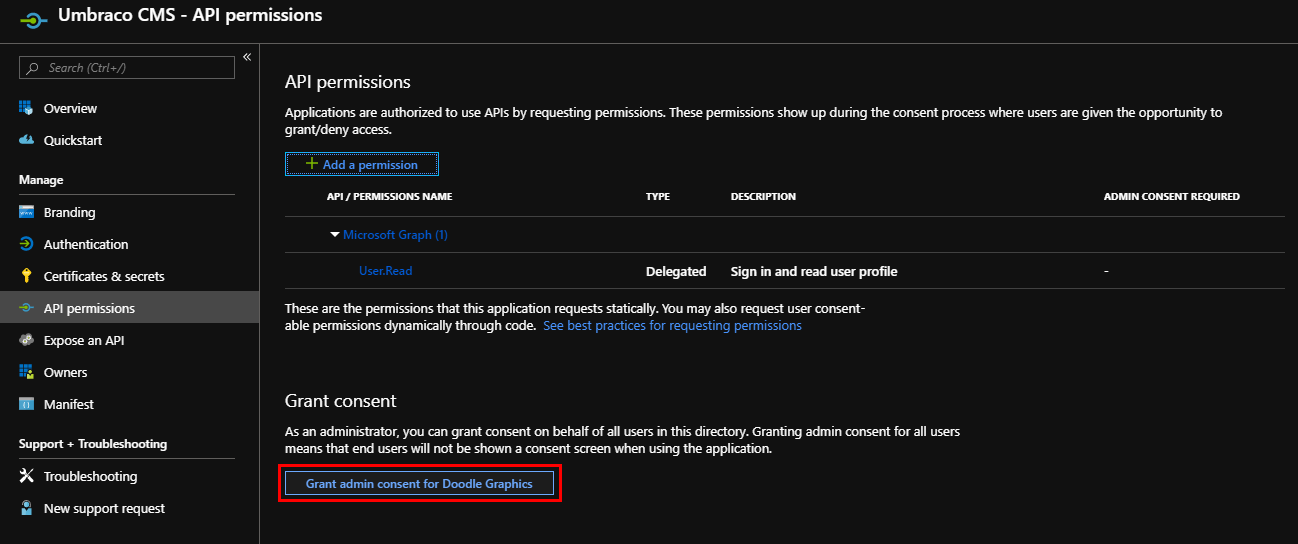
Next, under "API permissions", you ideally want to "Grant admin consent for [Your Directory]" for the User.Read permission that is added by default to the App:
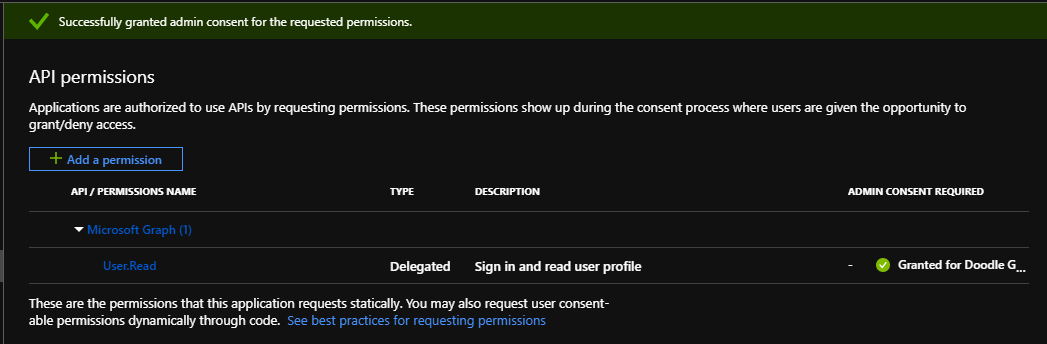
Which should result in the consent being given for all users:
Next you need to set up the Roles that your application is going to grant to users - these are what we're going to map to Umbraco's back office groups. If you don't want to use the new preview UI to create these, you can edit the manifest directly. Open the Manifest pane and find the "appRoles" array:
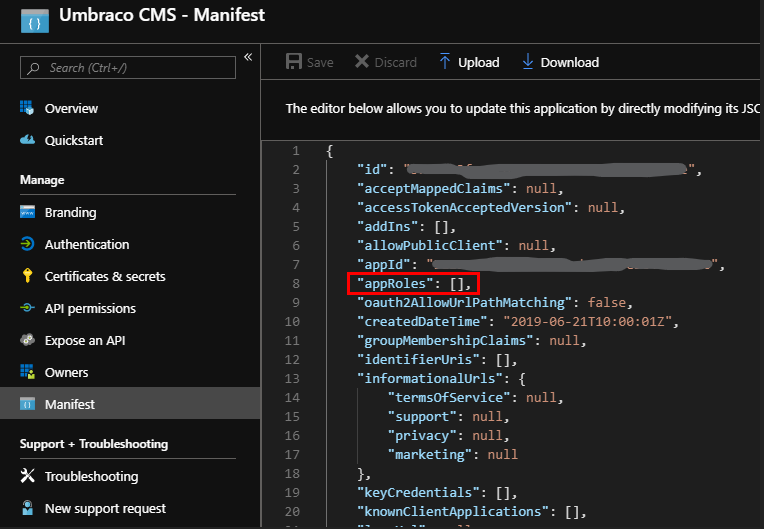
Put your cursor between the braces, and then add at least the following three roles - you'll need to generate a unique GUID for each role, and enter it as 00000000-0000-0000-0000-000000000000 (i.e. hyphens but no curly braces):
{
    "allowedMemberTypes": [
        "User"
    ],
    "description": "Members of the Umbraco Administrators group.",
    "displayName": "Umbraco Admin",
    "id": "[UniqueGUID]",
    "isEnabled": true,
    "lang": null,
    "origin": "Application",
    "value": "admin"
},
{
    "allowedMemberTypes": [
        "User"
    ],
    "description": "Members of the Umbraco Editors group.",
    "displayName": "Umbraco Editor",
    "id": "[UniquieGuid]",
    "isEnabled": true,
    "lang": null,
    "origin": "Application",
    "value": "editor"
},
{
    "allowedMemberTypes": [
        "User"
    ],
    "description": "Members of the Umbraco Writers group.",
    "displayName": "Umbraco Writer",
    "id": "[UniqueGuid]",
    "isEnabled": true,
    "lang": null,
    "origin": "Application",
    "value": "writer"
}
Note that the display name can contain spaces and the value parameter will be used to map to the Group Alias in Umbraco.
From the Overview blade of your application, make a note of the Application (client) ID and Directory (tenant) ID, as you'll need them later. You can also update the Branding for your application that may appear on your users Applications page - the logo also appears in the Application listings in Azure, so can be useful to help you spot it amongst all the others.
Having done all that, you can then configure some users - to do this switch to the "Enterprise Applications" blade in your Azure Active Directory and locate your new Application Registration - depending on your configuration you may have many or very few, and so may have to search for it either by name or the Application (client) ID.
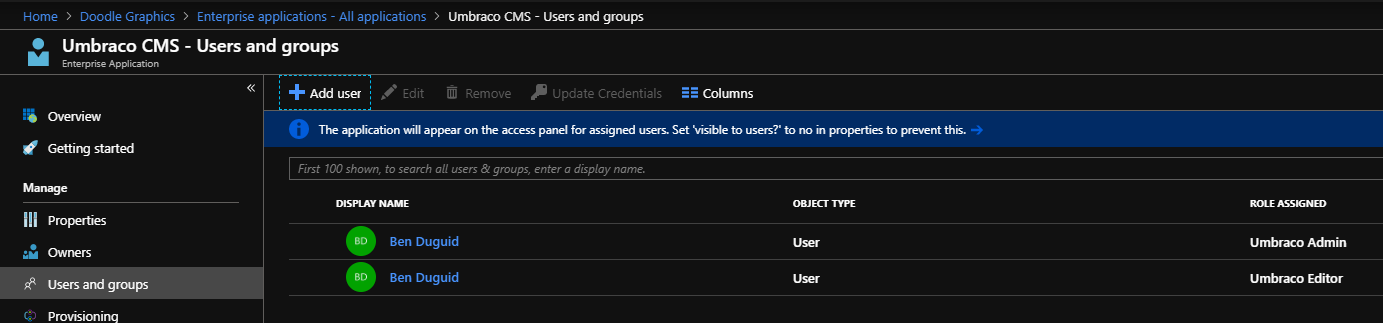
Select your application, and open the "Users and groups" blade and select "Add user". Depending on your Azure Active Directory plan, your experience may be better or worse - on the Free plan you can only assign users to roles, but with any of the paid plans (Basic and above) you can add groups to roles (when selecting users, groups and roles, make sure that you do press the "Select" button at the bottom of the blade each time!):
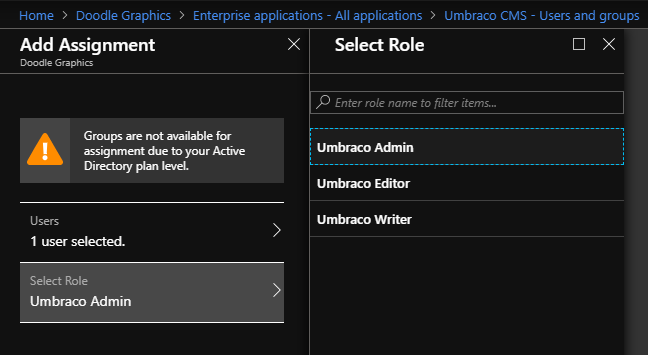
To add a user or group to more than one role, you need to add them multiple times:
Back in your code, first up add the Application (client) Id, Directory (tenant) Id and redirect URI to your appSettings in the web.config - these aren't secrets, so should be safe in source control, but you'll want to ensure that your redirectURI is updated for each environment so that your users are returned to the correct instance.
As I planned on using App_Start\UmbracoStandardOwinStartup.cs as the basis of my application, I updated the owin:appStartup setting to reference UmbracoStandardOwinStartup.
In the UmbracoStandardOwinStartup class, just update the call to ConfigureBackOfficeAzureActiveDirectoryAuth with the values added to the appSettings - note that you can use the Directory (tenant) Id for both the tenant and issuerId properties, which is useful if you're not sure which domain is associated with the directory.
The main changes are then in the UmbracoADAuthExtensions.cs class. This class contains the single extension method ConfigureBackOfficeAzureActiveDirectoryAuth called by the start-up class and this is where I got to work.
To resolve the issue with the user's email address not being found, I wrote a custom handler for the SecurityTokenValidated notification. To wire that up, add the following to the OpenIdConnectAuthenticationOptions constructor call:
Notifications = new OpenIdConnectAuthenticationNotifications
{
 SecurityTokenValidated = async notification => { AzureActiveDirectory.HandleNotification(notification); },
}
This calls the following custom method, which uses the user's full name (rather than just their first name) and then finds either the Email or UPN claims, which should contain the user's email address.
// Need to handle the case when the email address is returned on the UPN claim.
internal static void HandleNotification(SecurityTokenValidatedNotification<OpenIdConnectMessage,
                                                                    OpenIdConnectAuthenticationOptions> notification)
{
   var id = notification.AuthenticationTicket.Identity;

   // we want to keep name (as a whole name) and roles
   var name = id.FindFirst(ClaimTypes.Name);

   var email = id.FindFirst(ClaimTypes.Email) ?? id.FindFirst(ClaimTypes.Upn);

   var roles = id.FindAll(ClaimTypes.Role);

   // create new identity and set name and role claim type
   var nid = new ClaimsIdentity(
       id.AuthenticationType,
       ClaimTypes.Name,
       ClaimTypes.Role);

   nid.AddClaim(name);
   nid.AddClaims(roles);
   nid.AddClaim(id.FindFirst(ClaimTypes.NameIdentifier));
   var emailClaim = new Claim(ClaimTypes.Email, email.Value);
   nid.AddClaim(emailClaim);

   notification.AuthenticationTicket = new AuthenticationTicket(
       nid,
       notification.AuthenticationTicket.Properties);
}
That should get basic authentication up and running, but requires users exist in Umbraco already so we need to enable Auto Linking, and then add and remove groups based on the roles included in the claim from Azure AD.
Back in ConfigureBackOfficeAzureActiveDirectoryAuth, we need to create a new ExternalSignInAutoLinkOptions object and add it to our OpenIdConnectAuthenticationOptions object. Again, this is going to use a couple of custom handlers to configure the values:
// Don't add the user to any groups by default, these should be added by the claims from Azure.
var autoLinkOptions = new ExternalSignInAutoLinkOptions(true, new string[] { }, defaultCulture: "en-GB");

// Handle the Roles from the Azure AD Application
autoLinkOptions.OnAutoLinking = AzureActiveDirectory.OnAutoLinking;

// Check the Roles from the Azure AD Application on subsequent login
autoLinkOptions.OnExternalLogin = AzureActiveDirectory.OnExternalLogin;

adOptions.SetExternalSignInAutoLinkOptions(autoLinkOptions);
The OnAutoLinking method is fairly simple as it just calls out to the OnExternalLogin method:
internal static void OnAutoLinking(BackOfficeIdentityUser user, ExternalLoginInfo info)
{
    // Let login handle sorting out the roles.
    OnExternalLogin(user, info);
}
The OnExternalLogin does all the heavy lifting
public static bool OnExternalLogin(BackOfficeIdentityUser user, ExternalLoginInfo info)
{
    // check user is still in an editing group
    var applicationRoles = info.ExternalIdentity
                               .FindAll(c => c.Type == info.ExternalIdentity.RoleClaimType)
                               .Select(c => c.Value)
                               .ToList();

    if (applicationRoles.Any())
    {
        var groups = user.Groups.ToList();

        var groupsToRemove = groups.Where(g => !applicationRoles.Contains(g.Alias))
                                   .ToArray();
        var groupsToAdd = applicationRoles.Where(r => !groups.Any(g => g.Alias.Equals(r)));

        // Remove old groups and reset the group array, then sort out the roles.
        // Has to be done this way to ensure correct change tracking on the underlying user.
        foreach (var group in groupsToRemove)
        {
            groups.Remove(group);
        }

        user.Groups = groups.ToArray();

        foreach (var group in groupsToRemove)
        {
            var userRole = user.Roles.FirstOrDefault(r => r.RoleId.Equals(group.Alias));

            if (userRole != null)
            {
                user.Roles.Remove(userRole);
            }
        }

        foreach (string group in groupsToAdd)
        {
            user.AddRole(group);
        }

        return true;
    }

    return false;
}
And with that in place, you should then be able to log in to your Umbraco instance using the credentials attached to the account linked to the Azure AD (for example a Windows Live, Office 365 or Federated AD account). As you add or remove roles from the user, these are reflected each time they authenticate through the application.
Filed under: ASP.NET MVC, Azure, Umbraco
I recently had a requirement to lock down some media items (PDFs in this case) within Sitecore so that only certain logged in users could access them. In principle this is trivially easy - ensure the users are in the right roles, remove read access from the extranet\anonymous user and grant read access to the specific roles. However, as always, the devil is in the details.
Whilst the above steps did work and users were correctly sent to the login page there was a problem - once the user logged in, they were just sent to the home page of site rather than being returned to the item they'd requested.
Checking the web.config I found the following setting, which defaults to false:
<setting name="Authentication.SaveRawUrl" value="true" />
But setting it to true here didn't actually make any difference - because the out of the box MediaRequestHandler ignores this value. I'm not really sure whether that makes sense at all - if I lock down some images for example, but then include them on a publicly accessible page the user isn't going to be prompted to log in, they'd just get broken images as the browser requests an image but gets HTML in response, but in the context of a PDF or other document surely you'd want to log in and be returned to the correct place.
Anyway, the solution was fairly straight forward. I created a new RestrictedMediaRequestHandler that inherits MediaRequestHandler and then overrode only the DoProcessRequest method:
/// <summary>

/// Extends the Sitecore MediaRequestHandler to include the requested

/// URL in the redirect to the login page.

/// </summary>

public class RestrictedMediaRequestHandler : MediaRequestHandler

{

  protected override bool DoProcessRequest(HttpContext context)

  {

    Assert.ArgumentNotNull(context, "context");

    MediaRequest request = MediaManager.ParseMediaRequest(context.Request);

    if (request == null) {

      return false;

    }


    Media media = MediaManager.GetMedia(request.MediaUri);

    if (media != null) {

      // We've found the media item, so send it to the user

      return DoProcessRequest(context, request, media);

    }


    using (new SecurityDisabler()) {

      // See if the media item exists but the user doesn't have access

      media = MediaManager.GetMedia(request.MediaUri);

    }


    string str;

    if (media == null) {

      // The media item doesn't exist, send the user to a 404

      str = Settings.ItemNotFoundUrl;

    } else {

      Assert.IsNotNull(Context.Site, "site");

      str = Context.Site.LoginPage != string.Empty ?

          Context.Site.LoginPage : Settings.NoAccessUrl;


      if (Settings.Authentication.SaveRawUrl) {

        var list = new List<string>(new[]

                                    {

                                        "item",

                                        Context.RawUrl

                                    });


        str = WebUtil.AddQueryString(str, list.ToArray());

      }

    }


    HttpContext.Current.Response.Redirect(str);


    return true;

  }

}
Then I updated the web.config to tell the sitecore media handler to use this new handler instead of the default one, and all was well in the world:
<add verb="*" path="sitecore_media.ashx"

     type="Custom.Infrastructure.Sitecore.RestrictedMediaRequestHandler, Custom.Infrastructure"

     name="Custom.RestrictedMediaRequestHandler" />
And now when a user requests a PDF they don't have access to they are sent to a login page that can return them to the PDF afterwards.
Filed under: ASP.NET, Sitecore
I've had a Raspberry Pi (original model B) sitting around at home for about a year, and I've been wondering what to do with it for most of that time. I've finally decided that as we're decluttering the house* we need a better way to access all the music that currently sits on the media shares of an original Windows Home Server that we use for backups and media storage.
So I've got together the following hardware:
-
A Windows Home Server, with the Guest user enabled as follows:
-
No password
-
Read Access to the Music, Videos and Photos shares
-
A Raspberry Pi Model B
-
A tiny USB wifi dongle (or one very much like that)
-
An 8GB SD card (they recommend a class 10, mine's currently a class 4)
-
A USB mouse
-
A TV with an HDMI port and its remote (for initial configuration)
-
A stereo amplifier with an AUX port and some speakers (we're running the Pi headless)
The software needed was:
-
The OSMC Installer (I went for the Windows one) - currently Alpha 4
-
A SSH client - what confused me here was the reference to PuTTY in the docs - I thought I had that as part of GitExtensions but Plink (described as "a command-line interface to the PuTTY back ends") is not really - so I used Bash that was installed by Git and that worked a treat - but I'm sure the proper PuTTY client would be fine as well
The process I followed was then (I'm mostly documenting this so that if I have to do it again, I'll have one location to refer to):
-
Install OSMC on the SD card, setting up the wireless connection during the installer - this is currently the only way to configure this
-
Insert the SD in the Pi, insert the wifi dongle and mouse and connect it to the TV before powering on
-
Revel in the wonder that is OSMC running on your telly box.
-
Change the skin - there are few known issues with the default skin - I'm currently using Metropolis, but might switch to Conq as it seems even lighter (and I'm not really going to be seeing it).
-
Choose a web server addin of your choice - I'm currently really liking Chorus, which works nicely on Chrome and is responsive enough to have a "remote" view on mobile devices.
-
Set the Audio output to at least "audio jack" (or possibly both if you want to test it on the TV first)
-
I wanted to change the webserver port to 80, but that's only been fixed post Alpha 4.
-
I also turned on AirPlay "just in case" - although most of the devices don't have anything suitable to stream.
-
On my computer, fire up bash and connect to the Pi via SSH:
ssh [email protected]
-
Enter the password when prompted and you should be in
-
Set up the mount points - you need to create local folders to hold the mounted network drives first, so I went for the following steps which creates them under the osmc users home directory:
sudo mkdir media/music

		sudo mkdir media/photos

		sudo mkdir media/videos
-
You can then try mounting your network drive - and I suggest you do so that you can iron out any issues - as a point of note, it appears that you can either use an absolute path or one relative to your current location:
sudo mount -t cifs -o guest //[servername]/music music
This basically says:
-
Mount a device using the CIFS module:
mount -t cifs
-
Pass the option "guest" to use the guest user:
-o guest
-
The network path to mount:
//[servername]/music
-
The mount location:
media (in this case the folder below the current location)
-
If that works, you should be able to change into your music directory and see the folder structure that exists on your server.
-
You now need to get these to mount every time the Pi boots (hopefully not all that often
 ). OSMC comes with the nano editor pre-loaded, so open your File System Table file as follows:
sudo nano /etc/fstab
-
Then I added the following lines:
//[servername]/music  /home/osmc/media/music  cifs guest,x-systemd.automount,noauto 0 0

		//[servername]/photos /home/osmc/media/photos cifs guest,x-systemd.automount,noauto 0 0

		//[servername]/videos /home/osmc/media/videos cifs guest,x-systemd.automount,noauto 0 0
These are similar to the mount command above:
-
The network path to mount:
//[servername/music
-
The full path to the mount location:
/home/osmc/media/music
-
The mount type:
cifs
-
The comma separated mount options:
guest,x-systemd.automount,noauto
A bit more information about these options: as we need to wait until the network is up and running before we can mount the drives, luckily the people behind OSMC have thought of that:
-
Use "guest" credentials (standard option for cifs):
guest
-
Use the OSMC custom auto-mount script:
x-systemd.automount
-
Do not use the standard auto-mount:
noauto
-
Two further options about closing/hanging options I think:
0 0
-
Saved the changes (Ctrl+o), exited nano (Ctrl+x) and exited the console (
exit)
-
Back in OSMC, I then rebooted the Pi. If all's gone well, it should restart without any errors.
-
I then went and added the new mounted folders to their respective libraries within OSMC, not forgetting to tell it to build the music library from the added folder.
Phew - quite a lot of steps, but I'm now sitting here listening to my music collection on the stereo with a "permanent" solution.
Now that I know it works, what would I change? I'd probably spend more than a fiver on the wifi dongle, and I might get a better SD card too - the playback can be a little stuttery... seeing as we're about to move into our loft room, grabbing a new Raspberry Pi 2 and popping it up there looks like a no-brainer 
Filed under: OSMC, Raspberry Pi
Note: This has been sitting in my queue for nearly a year, mainly because I didn't find a nice solution that worked with workflows - but I thought I'd finish it up and move on - 10/02/2015
I've been looking into some options for informing editors about the state of long running processes when carrying out a Sitecore workflow action. Typically, the UI will freeze while the workflow action is happening - which can cause issues with browsers (I'm looking at you Chrome) that decide that the page has timed out and just kill it.
In our particular case, we are generating a static copy of our site (as XML, html and a packaged .zip container) for use within a Magazine App container - the content is all hosted via a CDN, and only gets updated when a new issue is published. However, processing a number of issues and languages can take a little while.
I'm currently favouring a fairly simple Sitecore Job running in the context of a ProgressBox, which is working, but has a few rough edges.
The key advantages this method has are:
-
It keeps the connection between the browser and the server active, which keeps Chrome happy.
-
There's a visual indication that "something is happening", which keeps editors happy.
The issues I'm currently looking into however include:
-
Because the task is running asynchronously, the workflow action "completes" (at least from a code point of view) before the Job finishes.
-
Because of 1, there's no way to stop the workflow and mark it as "failed" if there are issues with the process.
Not long after I started writing this, the client requested that we remove the various status checks from the workflow conditions (so they could run the process for staging without having to complete the entire magazine) and I came to the conclusion that having this as a Sitecore Workflow didn't really work for because the editors workflow was: work on a few pages, package for staging, work on a few more pages, package to staging, etc. until it was ready to package to production - with the Workflow in place they had to keep rejecting the build to staging so they could re-run that step.
We therefore needed to replace the workflow with some custom ribbon buttons allowing the editors the package the content for staging or production as needed.
Filed under: Sitecore, Sitecore Jobs, Sitecore Workflow
